


Optimizing Shopify Image Sizes: A Complete Guide
What’s the number one thing a customer instantly notices when they visit your Shopify store?
It’s the product’s images!
Thus, creating quality product images is extremely important to increase your sales. But did you know? Your product images don’t only require looking good. They must also be of the right image size as well!
That’s what most retailers miss out on while optimizing their Shopify stores!
Remember that if you make the same mistake, you lose your potential customers.
Using the wrong Shopify image size makes a terrible impression on your Shopify store. It also negatively impacts your website’s SEO, loading speed, and user experience.
So stop making this blunder right away and optimize your Shopify image sizes firsthand.
This guide lets you know every detail of how to change product image size in Shopify.
What Do We Mean by “Image Size” in Shopify Store?
Choosing the wrong image sizes creates an unfavourable experience for customers when they visit your Shopify store. Two types of image sizes mean business when we talk about optimizing Shopify image sizes.
- Dimension and Pixels of An Image: The max image size supported by Shopify is 4472 by 4472 pixels. Also, different dimensions are required for different image types on your Shopify store.
You must choose the right ones. If you fail to do so, your images might appear blurry and stretchy to your buyers.
- Image File Size: Shopify allows uploading file sizes up to 20 MB. When your total image file size is too large, your website’s speed is affected.
Thus file sizes are critical to optimization. You need to choose images that are compressed in size but without image quality being lost.
Why Is Image Size Important for Your Shopify Website?
Put yourself in your client’s shoes, and you’ll know how unoptimized image sizes negatively impact your Shopify store.
If you don’t upload the best product image size for your Shopify store, your viewers might find themselves looking at randomly cropped or overstretched images. This will backfire on your product’s conversions and sales.
If you have heavy image file sizes uploaded on your Shopify store, your website will take ages to load, and your customers won’t wait that long.
To grow your business, you should know how to change your product image sizes for Shopify. Well-optimized Shopify image sizes can improve your Shopify store in various ways.
- Zooming: When your visitors check out your product images using smaller screens like mobiles, optimized images would zoom in easily without much time. Thus images won’t look unclear and enlarged.
- Faster Load Speed: Optimized image file sizes on your Shopify store make your store load faster within a few seconds. .
It also aids in improving user experience. Customers would bounce less from your store and would enjoy time exploring your site. You’ll get to display your Shopify website effectively to your clients.
- Overall SEO Enhancement: Optimized image sizes aid in the better visual representation of your Shopify products, potentially enhancing user activity and your page performance. Also fast speed is a ranking factor for Google. Thus, smaller image file sizes can potentially facilitate better SERP rankings.
- A Smooth User Experience: Customers like to examine product images thoroughly. It helps them understand the product’s features and specifications. In doing that, they need to see images sizes that are well optimized, and are of consistent sizes — not visibly poor or pixelated.
Keeping your product images consistent improves the credibility of your Shopify store.
What’s the Perfect Shopify Image Size?
There are different types of images in Shopify stores. Each image type performs an explicit function and has distinct requirements.
The chart below explains every image type, and its specificities in an understandable manner.
| Image Type | Definition | Max Width | Max Height | Aspect ratio | File Size | Notes |
| Shopify product image | Products’ pictures displayed on your Shopify store. | 4472pixels | 4472pixels | 1:1 | 20 MB | Product images larger than the max resolution will appear blurry when downsized. |
| Shopify collection image | Featured images for collections that group same-category products. | 4472 pixels | 4472 pixels | 1:1 | 20 MB. | You can’t remove certain products afterwards until you edit the product details or change the collection’s conditions. |
| Shopify slideshows | Automated slides to showcase featured product images along with your CTA. | 1200-2000 pixels | 400-600 pixels | 3:1 | Shopify doesn’t have a built-in slideshow feature. You need to use a third-party app or a custom code. | |
| Shopify logo image | Making your brand stand out from others. | 250 pixels | 250 pixels | 1:1, 2:3, 4:1 | 1 MB | The larger the size of the logo, the longer it takes the page to load. |
| Shopify blog image | Featured images that appear at the top of your blog article. | 2240 pixels | 1260 pixels | 16:9 | 3 MB | Don’t waste storage on high-pixel blog images since the blog’s purpose is text. |
| Shopify background image | The largest among all image types, which act as a CTA for your business if you use it sensibly. | 2500 pixels | 1406 pixels | 16:9 | 20 MB | Adding a background image can be tricky if you aren’t aware of Shopify codes. |
Now that you’ve become aware of image types and the required image sizes for your Shopify store.
Let’s look for ways to optimize your Shopify images, from file size reduction to dimension resizing.
How Do I Optimize Shopify Image File Sizes in Shopify?
Optimizing Shopify image sizes can be pretty confusing for anyone. It’s not easy for a non-tech person to keep up with the technicalities of editing image file sizes.
While Shopify claims it can compress image sizes automatically, its drawbacks are very obvious too, including images going blurry. By comparison, there’s a more straightforward solution to this problem of yours. You can optimize your image file sizes using a third-party app like the SEOAnt app.
SEOAnt is a Shopify SEO app that can automatically optimize images for Shopify stores. Some of its image optimisations include:
- Lossless and lossy compression. You can even customize your own compression rate.
- You can automatically or manually compress your images
- You can also add watermarks to your images.
- Convert your PNG files to JPG.
- Additionally, it can help you bulk-add ALT text to your images.
Here are the steps:
- Install SEOAnt’s SEO&Image Optimizer.
- Go to the dashboard, and choose Image Optimization.
- On the right, choose the Settings icon beside Account Overview. Switch on the Optimize Images button. Choose the compression mode and images you want to compress. Save the changes.
How Do I Resize An Image’s Dimensions in Shopify?
Shopify automatically resizes images located in the featured product section of your store. But it doesn’t resize all images.
Moreover, If you upload over-sized images on your Shopify store, they might appear distorted to your consumers.
For this you need to manually resize your Shopify images. There are many free tools available online such as iloveimg for this purpose.
Shopify Image Optimization Tips
Shopify image optimization makes images look visually appealing to customers without degrading the quality of images.
But when it comes to image optimization, does it only mean to change image dimensions or compress image file sizes?
Nope! Other factors are also at play. Follow these tips to get the best from your Shopify images.
- Best Resolution for Shopify Images
You can upload images up to 4472 by 4472 pixels with a filesize of 20 MB. The max resolution for Shopify images is 72 dpi.
- Best Product Image Formats for Shopify
Shopify supports many product image formats, including JPG/ JPEG, PNG, GIF, TIFF, and HEIC. Among them, HEIC and TIFF are the least used formats.
JPEG is the most commonly used and recommended product image format for Shopify. As compared to other image formats; JPEG provides the most compressed image file sizes without rendering quality and colour range.
- Add Alt Text and File Names
Alt texts are text used to describe your Shopify product images. If your images fail to load somehow, Alt texts appear as a quick replacement.
Adding alt texts will help your customers with low vision to understand your products. This can ultimately increase traffic in your Shopify store.
Adding Alt texts also aids in the betterment of image SEO. Images properly optimized with alt texts appear faster in the search engines than vice versa. This is because alt texts help search engines understand the relationship between page content and the image.
- Lazy Loading
You know that customers can leave within 3 seconds if they find trouble loading your site.
Using lazy loading techniques on your Shopify store can make your customer stay longer. It makes your customers perceive that your site is loading quickly, but in reality, it’s not.
While your site’s pages are loading, your customers don’t get stuck seeing completely blank pages. Rather they get to see blurry, low-quality images loading.
These blurry images get instantly replaced with higher-resolution images as they scroll down. Many shopify stores use this technique to maintain customer interaction on their sites.
- Don’t Use Large Images Often
Large shopify images might occur cloudy on your mobile screens. This will most likely lead your potential buyers to bounce back from your Shopify store.
Also, nowadays people like to explore the internet with their mobiles, whereas laptops are mostly limited to office-based work. Since mobiles are handy and less space-consuming, optimizing large images until they become mobile friendly is a must for your Shopify store.
- Use square product images
If Shopify image sizes of your products aren’t coherent, they will make your store look disorganised. Product images look best when they are centered both vertically and horizontally.
Also, use square images with 800 by 800 pixels.Those are smaller, take up less space, and are attractive to the eyes.
Note: Less than 800 by 800 pixels would restrict the zoom functionality of your Shopify square images.
FAQs
- How to add images to your Shopify store?
Follow these simple steps to add images to your Shopify store.
- Log into your Shopify account, then go to Shopify admin.
- Select the homepage, collection, or single product page accordingly where you want to add your image.
- Move the cursor from “rich text editor” to the desired place where you want your images to be displayed.
- Choose “clock image” and then upload your image file.
- Click on the image that you want to upload, then go for the “image size” option.
- Don’t forget to add alt-text images to improve your page SEO.
- Choose the “insert image” option so you can add your image to the content
- Does Shopify have image size requirements?
Yes, Shopify has specific image size requirements. The max image size that Shopify allows is 4472×4472 pixels with a 20MB file size.
- Does Shopify automatically compress images?
Yes, Shopify can auto-compress images on your Shopify store. It does so to improve the loading time of your website. But it’s not recommended to go for this method. This is because it will take a long time, and the images may appear blurry. Instead, you’d better use a professional third-party image compression tool like SEOAnt.
- How to check my images in any screen resolution?
You can find out your image’s screen resolution using inspector tools located in your browser.
Here is how you can use the inspector tools to find out your Shopify image sizes and resolution.
- Open the webpage, right click on the image you want to check the resolution for.
- Choose the “Inspect” option. It will open up all the information about your webpage in codes.
- Your image information will appear highlighted in the inspection panel.
- Hover over the highlighted part. A bluish overlay will appear over your image along with a code box.
- Your image resolutions will be mentioned in the code box.
- How to set a logo width?
You can set the logo width with the following steps:
- Log into your Shopify account.
- Go to “Admin.”
- Find the “Online store” present on the left side of the screen.
- Choose “Themes” from the drop-down screen.
- Select the “Customize” option on the newly loaded page.
- Choose the “Header” section to optimize your logo width from the directed page.
- Upload your logo image without making any changes or use a custom logo tool to customize your logo width.
- How to fix contrast issues with images and text?
There are many contrast ratio tools available online. Use one of them to fix the contrast ratio between the background and text on your Shopify store.
As a general rule of thumb, W3c recommends using a standard 4.5:1 text over background ratio.
- Is JPG or PNG better for Shopify?
JPG is better than PNG as it compresses beautiful colour images with smaller file sizes. On the other hand, PNG images offer high-contrast images but in larger file sizes.
- What is the highest quality format for an image?
JPG/JPEG is the highest-quality image format for images. It compresses your image file size without compromising your image quality. JPG format is also the recommended image format for Shopify product images.
Step-by-step Guide to Speed up your Shopify Website in 2023
As a Shopify store owner, your site speed is crucial to the success of your business. Fast loading time often means a better user experience, a lower bounce rate and higher user engagement. It also directly impacts your sales and conversions greatly. According to analytics by Portent, the highest ecommerce conversion rates occur on pages with load times between 0-2 seconds.
Are you looking to improve your Shopify store speed? Then this comprehensive and actionable guide is for you. Let’s get started on creating a faster and higher-converting Shopify store today!
Why do you need to speed up your Shopify website?
Visitors aren’t as patient as you want to think, so a slow website outright leads to discouraged customers and lost sales. Below are reasons why you just have to speed up your Shopify website:
1. Improved User Experience: If a page takes too long to load, visitors can get frustrated and leave. Actually, 40% of people abandon a website that takes more than 3 seconds to load. If your pages load quickly, they are instead more likely to stay longer and browse more products.
2. Increased Sales and Conversions: Research has shown that a delay of just 1 second in page load time can result in a 7% decrease in conversions. As a Shopify store owner, your goal is to convert as many visitors as possible into paying customers. By speeding up your website, you can increase the likelihood of visitors making a purchase.
3. Better SEO: Google factors in site loading speed when determining SEO rankings. If your site is slow to load, it’s less likely to appear at the top of search engine results. A faster website can help improve your SEO and drive more traffic to your store.
4. Mobile Optimization: With 60.9% of website traffic coming from mobile devices, it’s important to make sure your website is optimized for mobile users. A slow loading website can be particularly irritating on a mobile device, due to its smaller screen size and limited processing power compared to a desktop computer. This can turn your potential customers away.
5. Cost Savings: A faster website can reduce your hosting costs and save you money on bandwidth. It can also help you get more out of your ad spend by retaining users longer and increasing the probability of them buying goods.
Now that you understand the importance of a fast-loading website, want to know how fast your website runs? Evaluate your own site’s speed with tools listed below!
Test your Shopify site speed
Running a speed test can help you find out how quickly your site is loading and what issues are affecting its performance.
There are several free tools available that can help:
- GTmetrix: This tool analyzes your page’s speed performance, provides actionable recommendations on where to improve, and also tracks your historical performance data.
- WebPageTest: WebPage Test allows you to run a free website speed test from multiple locations around the globe using real browsers (IE and Chrome) and at real consumer connection speeds.
- Pingdom: Pingdom checks the load time of a page, analyzes it and shows the performance bottlenecks.
From the report generated by these tools, you may find that usually images, apps, codes, and http requests are some of the key factors affecting your store speed. However, don’t worry. Up next, we will show you the easiest ways to troubleshoot each.
Things to Optimize on your Shopify Website
If you don’t know what to optimize or have optimized the wrong things in vain, your store may become a ghost town deserted by target customers; customers who couldn’t spend forever waiting for your site to load. So keep reading to learn the most important things to optimize to speed up your Shopify website.
1. Optimise your Images
According to Shopify, image size is important for three main reasons: user experience, page speed, and rankings. While images make your store more attractive and interactive, oversized and unoptimized ones can greatly slow down your page load. This could also lead to lower user satisfaction and potentially hurt your SEO rankings. Here are the key ways to optimize your images for a faster site:
- Image Compression
Images usually make up a large portion of a Shopify website’s total weight. If an image is 1MB and used on multiple pages, it will add an extra 1MB of data to be loaded every time a user visits. But by reducing the image file size by 50% to 80%, you can see significant improvements in your site speed. Additionally, your image quality will not be lost, if you use professional image compression tools!
- Converting PNG to JPG
PNG uses lossless compression, maintaining all the image data but this results in larger file sizes. By comparison, JPG uses lossy compression, meaning it discards some image data to achieve smaller file sizes. Converting your PNG images to JPG can help to reduce the file size.
However, this isn’t a one-size-fits-all rule. PNG supports transparency, meaning that the image’s background can be see-through, but JPG doesn’t. JPG format could therefore sometimes cause your images to look incorrect.
Note that images that require high quality and clarity shouldn’t be converted. Images such as logos and thumbnails are key to maintaining your brand’s visual identity and users need a super-clear idea of what they contain. Converting these images can make them appear blurry or pixelated, negatively impacting your brand’s image. The same goes for images that contain fine details like graphs and charts, icons and buttons, infographics, etc.
- Using static images instead of GIFs
GIFs are often larger in file size compared to PNG or JPG images of the same dimensions, which can affect how fast your page loads. That’s because static images are more efficiently compressed, resulting in smaller file sizes.
GIFs are actually not optimized to be used on the web. Platforms like Twitter actually avoid them by first converting GIFs to video files (mostly MPEG4) so they don’t affect their speed by their long load times.
Putting these together, GIFs are image formats you clearly want to avoid if you care about your store’s speed and UX.
- Replacing sliders with Hero images
Sliders can easily make your store load slower, especially if the images are weighty or if the slider contains multiple images. Though typically larger, Hero images are often optimized for swifter page loading, since they require less scripts or plugins and are often lazy loaded.
Additionally, Hero images are usually resized and reformatted to fit the smaller screens of mobiles. However, sliders can be difficult to navigate on mobile devices, and the images may not resize correctly, resulting in a negative user experience.
There are also extra benefits of Hero images over sliders. Take a look if you are interested.
- Search engine optimization: Sliders can be less optimized for search engines because the images in a slider may not be indexed or ranked as highly as standalone hero images.
- Accessibility: Hero images can be easily accessible to users with visual disabilities, if optimized with Alt text, captions, etc. Doing the same for sliders is more challenging as they often contain dynamic images, making it difficult for screen readers to interpret.
- User engagement: Hero images are designed to grab users’ attention and send a clear, concise message about your product or brand. Sliders can be overwhelming and distracting. Users may not spend enough time to engage with all of the images in the slider.
2. Optimize Your App Usage
Most Shopify apps are built using JavaScript and CSS to enhance the functionality and appearance of a store. Once installed, apps will add their codes to your store, which run in the background to provide dynamic and interactive experiences for customers.
If not properly managed, they can significantly increase your page size, cause compatibility issues, and slow down your store. Here are some of the things you can do to prevent that:
- Remove unused apps.
By removing these unused apps, the store can reduce the amount of code that needs to be loaded and executed per time. This could improve the overall performance of your story.
- Log in to your Shopify admin panel.
- Go to the Apps section.
- Review the list of apps installed on your website.
- Uninstall any apps that are no longer needed or used by your website.
- Disable unused app features
You can also simply disable some unused features of your apps. By tracking how users interact with your website with Heatmap tools like Hotjar, you can identify which features are most valuable and should be maximized, likewise the least used ones you should get rid off.
Then, go to the App section of your store, locate the app and disable the feature you wish to:
- Clean the code residue of installed apps
When apps are removed from your Shopify website, their codes may still remain. Eliminating it isn’t a walk in the park. Either you have developers onboard, or hire professional expert services, in case you mess up your store codes.
3. Optimise Elements of Your Theme
Some elements in your theme can drag down your store. You can do the following to give your website a speed boost.
- Use system fonts
System fonts are fonts that are pre-installed on most computers and devices. Compared to custom fonts, they don’t need to be downloaded externally from a server, reducing the HTTP requests to load the content and thereby improving your page speed.
You can use a font family like mono, serif, or sa ns-serif. They don’t require a font license while looking great for customers.
- Disable non-essential theme features
Same as app features, disabling non-essential theme features such as pop-ups or sliders can also hasten your webpage. This will reduce the amount of code to load, likewise cut down distractions.
However, before disabling anything, you should consider how important these features are to your user engagement and conversion. Use Google PageSpeed Insights or GTmetrix to identify which elements are slowing down the website and should be removed or optimized.
- Use a lightweight, speed-optimized website theme.
A lightweight theme can set your store on a fast track to retain customers, saving you tons of time and costs in speed optimization.
Note: Changing a Shopify theme is not hard. However, you might lose some customizations and added features, if not carefully.
4. Optimise Your Videos
Videos can help you engage visitors and keep them focused on your site longer. However, unoptimized ones are often hefty, slowing down your page loading time. Your visitors may impatiently bounce and browse your competitor’s store instead.
Here are a few ways to optimize your videos to reduce page buffering and lag time.
- Embed product video links instead of uploading them.
By embedding a video from a third-party video hosting service, such as YouTube or Vimeo, you can save on storage space and bandwidth. What’s more, these services typically have faster load times and better video quality than videos directly uploaded to a website.
- Lazy load videos.
Lazy loading defers the loading of non-critical resources on your webpage, such as images and videos, until they become visible to the user. This can reduce the initial load time of your web pages. The bottom line is not to go for faster loading at the expense of user experience, like compressing video resolutions excessively. Strike a balance!
For example, ensure that your video is clearly visible and embedded in the right place. This way, users don’t have to scroll through long pages to find it.
5. Optimise Your Site Codes, Links and Requests
The HTML, CSS, JavaScript files, plugins, HTTP requests, all contribute to your store’s overall weight and the number of resources needed to display your pages correctly. Here’s how to optimize them. Note that some methods can be technically challenging. It’s best to use a professional service to get it done swiftly and easily if you don’t have a strong developer team.
- Minify HTML, CSS, and JavaScript files: This removes unnecessary white space and comments in your theme code, which can reduce the coding file size.
- Eliminate resources that are render-blocking: By this, the browser will not need to load resources until they are visible to the user.
- Address redirect loops: This means to correct any redirects that are causing the browser to go in a loop before loading the right page content.
- Migrate tracking codes to Google Tag Manager: That is, you’ll move the tracking codes to Google Tag Manager, which can improve the load time of your website.
- Use Gzip compression: Compress the data that is sent from the server to the browser. It can reduce the amount of data that needs to be sent and help your site get faster.
5. Enable AMP
AMP is a technology that creates lightweight versions of web pages that are optimized for fast loading on mobile devices.
To enable AMP on your Shopify store, you can install a professional third-party app like SEOAnt. This app allows you to easily enable AMP on your Shopify store with one click. You can also customize the design of your AMP pages to match the look and feel of your website.
6. Use Shopify’s built-in CDN
Shopify has a Content Delivery Network (CDN) that can distribute your website’s content to multiple servers around the world. This means, customers worldwide can access your page content simultaneously and quickly. It is specially built to help a Shopify store load faster. For this, you need to upgrade to the Shopify Plus plan.
How to Lazy Load Images on Shopify?
Being a Shopify owner, you should know how disadvantageous it is to have a slow-loading site. But the question here is, what makes your Shopify websites so heavy to load?
Well, there are multiple reasons. As you know, a Shopify store may have a number of visual effects, style sheets, crisp graphics, high-definition images, non-optimized videos, and plugins to keep your customers interested. They all consume lots of space, therefore slowing down your website.
But this problem can be resolved using a simple strategy called lazy loading.
Lazy loading can drastically lower your website’s loading time, reducing your customers’ bounce rates and increasing your conversions. It can also result in improving your Shopify website’s SEO.
Want to find out more about lazy loading and how it can positively speed up your page loading? Read on.
What Is Shopify Lazy Loading?
Lazy loading is also called on-demand loading. It is a useful programming technique that delays the loading of visual elements unseen yet by your visitors until they scroll down or click further.
Say you have 100+ pictures on your webpage. If your website loads all of them up front, chances are your page speed might drop greatly. And you lose sales because of it. But with lazy loading, your website will only display the first batch of images of the page the user is currently on, with other images down below being blurry.
This way, it makes your pages seemingly faster, and also more responsive, creating a smoother visitor experience.
Generally, you can lazy load images, videos, text, or any other media files on your web pages. Given Shopify stores are usually image-rich, the lazy loading of images becomes essential.
How Does Shopify Lazy Loading Work?
Lazy loading works by using JavaScript code or HTML attributes like ‘defer’ and ‘async’ to reduce elements needed for loading initially, hence cutting down your initial page weight, memory usage and page load time. This way, your store runs faster, delivers content in time, and your customers won’t unhappily quit.
For a visitor, how would that feel then? Well, when you browse a web page, images out of your view focus will be fuzzy, because these high-quality images are swapped temporarily by some low-resolution blurred images. As you interact on the page more, and bring them into the viewport of your screen, the high-quality and clear pictures will return.
Technically, you can implement lazy loading by replacing HTML src attributes into data-src as a placeholder. Once a page visual becomes visible to users, your JavaScript will dynamically update the data-src URL with the src attribute.
Why Do You Need To Implement Lazy Loading For Your Shopify Store?
Lazy loading is important to your Shopify store in different ways. Here is a glimpse of what it can do:
- Reduced load time and enhanced SEO. Google favors faster sites. Lazy loading lowers the initial time needed to run the visuals on your page, reducing the pressure on your servers, hence your site runs faster, and your store SEO performance may improve.
- To conserve bandwidth. When all images are loaded simultaneously, it takes unnecessary time and resources. However, lazy loading only delivers content upon request. With less data transmitted at one time, you save more bandwidth costs.
- To enhance customer satisfaction. Customers can browse your pages seamlessly, instead of staring at a loading circle, a progressing bar or a white screen all the time. This can improve your site’s conversion rates and page views.
How to lazy load images on Shopify?
There are multiple ways to execute lazy load on your store. Check below.
- Select a Shopify theme supporting lazy loading
This method involves the use of a Shopify theme that’s already integrated with lazy image loading, such as Ella. However, you shouldn’t compromise other important functionalities of your theme.
- Add lazy loading manually
Here you’ll need some coding background. Our recommendation is to use lazysizes.js image lazy loader because it is fast and optimized for SEO.
- Go to the theme assets folder in your Shopify store. Add the lazysizes.js library to the folder. Then insert it in theme.liquid.
- Look for image tags in the theme files. Swap the images’ src attributes with data-source. Your image tag will be turned into a small coding line like <img src=”IMAGE_URL”>
- Include the “lazyload” class and update the images. The coding line with the “lazyload” class added should look like this: <img data-src=”IMAGE_URL” class=”lazyload”>
- If you want animation effects, use CSS styling.
You can also use a specific script to lazy load images on Shopify. Simply add your specific code as follows:
- Open Shopify Admin.
- Go to Online Store and choose Themes.
- Click Actions > Edit Code and open the Layouts directory.
- Select theme.liquid and add this code to the online editor:
{{ ‘//cdnjs.cloudflare.com/ajax/libs/jquery.lazyload/1.9.1/jquery.lazyload.min.js’ | script_tag }}
Tip: Ensure to paste the code before the </head> tag section. When done, save the changes to lazy-load your Shopify store images.
- Hire expert services
If you are not well-conversant with coding, we advise you to seek the help of professional developers like SEOAnt’s expert team. They will ease your burden and manually implement your lazy loading accordingly.
How to Check If Your Shopify Lazy Loading Works?
There are three ways to tell if you have successfully implemented lazy loading on your website.
- Check manually
Simply scroll down the lazy loaded page yourself and see how the pictures engage with you. Are they blurry before scrolling but becoming clear after you scroll down? If yes, your Shopify lazy loading is working.
- Leverage the Shopify Analyzer
This tool will check if lazy loading works and offer practical tips to optimize your Shopify store.
Use your browser’s Inspect tool. To check if your Shopify lazy loading works, right-click on a page, select View Source on the page, and search lazy. You should find ‘lazy’ elements if your Shopify lazy loading works.
- Check with the Chrome DevTools
Launch the tool, open Network and click the Img filter. Reload your webpage and the images above the fold will show up in the image list of the tool. Scroll your page and you should see the images appear on the list one by one. It means your lazy loading is working.
When Is It Not Advised to Implement Lazy Load on Your Shopify Images?
Although tempting, not every single image on your Shopify store should be lazy loaded. Here are some cases:
- For images above the fold like the header and banner of your website. If they are not displayed to customers immediately, your Shopify site will appear visually incomplete, impacting their impression about your brand.
- When you use the Shopify Content Delivery Network (CDN), whose servers perform the loading tasks on your behalf.
- If you are only lazy loading to bait your page speed scores and not considering humanized user experience on your website.
- If your Shopify site already loads quickly with a strong server network, there is no need to lazy load your images.
When Should You Lazy Load Images On The Shopify Store?
The main point of lazy loading your website’s images is to serve your customers first and search engines next. Here are scenarios when you can consider lazy loading:
- Images that appear after the fold. You can apply lazy loading as it makes sense to load the images gradually since most users may not even reach the last images and it helps speed up the site.
- When you have many images yet you don’t use CDN, or don’t have strong servers.
- When your text content matters more than images to site visitors.
Lazy Load Design
Lazy loading your Shopify images shouldn’t be hard. For the best possible results, you can try these options to help you do it right:
- Use an image’s dominant color when loading. This is also aesthetically pleasant for your site visitors.
- Apply an entertaining blurry effect as images load. Using a lazysizes plugin called Blur-Up, you can apply a visually appealing yet stylish blurry effect to your images. This can be also done via script in theme.liquid.
- Use a spinning wheel GIF while the image is loading. This is also a useful trick to lazy load your Shopify images. It first displays a placeholder GIF of a spinning wheel before the real image can appear.
- Put your store’s logo to replace the whitespace. This can help strengthen your brand.
- Use a low-quality image placeholder. You can add images with poor quality to display first before the original photo loads fully. This improves your website’s interactivity with people browsing.
- Specify image container width and height using CSS. This helps to prevent CSS from making sudden layout shifts without your knowledge. If not careful, it can disrupt your site’s UX.
Lazy Load Videos
As with images, so too can you lazy load videos. Lucky if you already use a Content Management System (CMS), lazy loading attributes on images and videos may be automatically available.
Otherwise, use a plugin to enable lazy loading for your videos, irrespective of the browser your site visitors use. This is a more secure way of lazy loading. Some web browsers don’t support default lazy loading settings in CMSs.
If you have any trouble putting this into reality, panic not. Don’t hesitate to seek professional help. For example, SEOAnt expert services will make it a breeze for you to lazy load your videos.
How Do I Get Rid Of Lazy Loading On Shopify?
Although lazy loading is ideal for your store, there may be times when you simply want to remove it. Read below to know different ways to go about it.
- Change the theme. Most Shopify themes have automatically enabled lazy loading. To get rid of it, you have to change the theme to one that doesn’t have this setting.
- Remove the lazy loading script. If you added lazy loading by editing a Shopify theme, you could delete the code to remove lazy loading.
- Replace the src attribute with data-src. This applies if you added lazy loading to specific images.
- Remove the Javascript code. If you added loading to a JS document on your store’s assets directory, deleting it will get rid of it on your Shopify store.
Does Lazy Loading Help Or Ruin My Site’s SEO?
It helps your site SEO. In fact, lazy loading is a top image optimization strategy to help your Shopify site SEO efforts. Here is why :
- It decreases website load time. This improves your site’s discoverability, ranking, and user experience.
- It also improves your site LCP (Largest Contentful Paint) metrics which is crucial for SEO rankings. LCP measures how long a page’s main content loads to be ready for interactions. It could be images or blocks of text that appear on the first page (usually above the fold).
Other Shopify Speed Optimization Tips
Apart from lazy loading, there are other things you can do to increase your Shopify website speed:
- Compress your image file sizes: Use professional tools like SEOAnt image optimizer feature to reduce your picture sizes by up to 80%, without quality loss.
- Create AMP: Implement Accelerated Mobile Pages to help your pages load faster on mobile views.
- Utilize one Hero Image: Instead of using sliders to display several images at one time, use a single high-quality Hero picture instead, which loads faster and captures your site’s essence.
- Work on your codes: Codes are also a big component of your page weight. You need seasoned Shopify developers to help minify JavaScript and HTML, remove render-blocking CSS and JavaScript. That way, your site speeds are higher even when the internet is lagging and saves data.
Conclusion
To this point, we have exhaustively discussed lazy loading in detail. You should have no problems getting started for your website’s lazy loading practice. It is crucial for your website speeds, ranking, and SEO efforts. But, I must say that it isn’t as simple to have everything up and running without coding experience. Therefore, I recommend taking advantage of expert services offered by SEOAnt!

How to Noindex Pages on Shopify: A Comprehensive Guide (2023)
Looking to hide sensitive pages on your Shopify store from search engines and customers? The noindex tag can help. It helps ensure that your SEO efforts are focused on the pages that truly matter to your business.
Noindexing can help you:
- Remove out-of-stock items, expired offers, obsolete low-quality pages, test pages etc
- Protect private pages concerning your customers’ account and payment
- Prevent duplicate content issues
- Ensure search engines only index pages that can specifically impact your business
By the end of this guide, you’ll have a better understanding of how to improve your website’s visibility rankings by using the noindex tag. Let’s get started!
What is the Noindex Tag on Shopify?

The noindex tag is an HTML meta tag telling search engines, like Google, not to index a specific page on your store. This unindexed page will never be included in the SERPs.
By default, Shopify’s robots.txt file directs search engine bots, or “crawlers,” to the pages they should and should not view. For instance, a customer’s login, account and billing page are typically excluded for customer data safety concerns.
How Does Search Engine Indexing or Noindexing Work?
Search engines utilize automated software, referred to as spiders or crawlers, to scan and index various web pages on the internet.
Take Google as an example. After its spider finds a page, this search engine will analyze the page’s content, including the text, images, and video files, and determine their relevance to certain keywords or topics, and store all such information in its index(essentially a large database). When a user makes a relevant search in Google search bar, Google will return a list of search results from its index.
While it can take Google days or even weeks to index your web pages, you can also use sitemap and Google Search Console to speed up indexing, while setting up internal links and building backlinks.
However, not every web page is meant for search. In such a case, you will need the noindex tag, to instruct spiders to not index a page. So if someone inserts a query into search engines related to your content or products, the page won’t be listed.
It’s important to note that just because a page is not indexed, it doesn’t mean it’s not accessible to users anymore. The page can still be accessed by directly visiting its URL or following a link from another page. The noindex tag simply tells search engines not to include the page in their search results. Conversely, an index tag instructs the opposite.
You can control your page indexing by editing your store’s robots.txt file with the noindex directive or using noindex robots meta tags. While this may seem technical, it really isn’t. Especially when you consider that your store robots.txt file is automatically configured and optimized by Shopify. You’ll likely only have little to do.
What Pages Should I Index and Noindex on Shopify?
As a Shopify store owner, it’s critical to know what pages to index and non-index. A slip up mistake can end up disastrous, such as lowered search rankings, duplicate content penalties, or leaving your customers perplexed.
Pages you need to Index
- Home, Product and Collection Pages: These pages are usually the main source of traffic and revenue to your store. They contain unique and valuable details about your products and services.The faster they are indexed, the better.
- Blog Posts, FAQ pages: Blog posts and FAQs can drive a lot of organic traffic to your website, helping establish your brand as an authority. These resources serve both readers and search engines by providing valuable information and improving the relevance and quality of search results. To maximize their potential, they should be indexed.
- Pages with a rel canonical tag: The canonical tag is used to mark out the main version of a page for Google to index, among a pack of duplicates. Adding noindex tags to such pages confuses Google, and negatively affects your page rankings.
Other examples include contact us page, about us page, reviews, alternatives, etc.
Pages you need to noindex
- Login and registration pages: These pages typically contain sensitive information like customers’ login details and personal information. Indexing these pages makes them vulnerable to security threats such as hacking attempts or spam.
- Cart and checkout pages: These pages are usually only used during the purchasing process and should be private to individual users only.
- Password-protected pages: Pages that require a password to view should be noindexed because they contain information that is not intended for public viewing. Examples are employee portals and client dashboards.
- Tag and category pages: These pages group products under different tags such as “free shipping” “red”, or in broader categories, such as “clothing” or “electronics”. They both allow customers to easily filter and find products that match their search criteria. However, they are often automatically generated to help Shopify owners and can create duplicate issues if indexed.
- Thank you pages: These pages typically have little value to users and can be seen as duplicate content by search engines.
Note: There are mere suggestions and are not set in stones. There could be times where you would have to noindex pages that you’ve previously indexed, and vice versa. Here are examples of such instances:
- The page should be visible only during a specific season, such as winter coat pages during winter.
- The product or collection is out of stock.
- The information on the page is outdated and should not be visible to users in search results.
- You have a beta version of your website, and all the test pages should just be visible to your team only.
How to noindex a page on Shopify?
Proper indexing control is key to improving search visibility on your Shopify website, which makes it important to learn how to do so. And just so you know, the guidelines below present the ‘how’ in a super easy way.
1. Noindex with a third-party app(SEOAnt)
The easiest and most user-friendly way to noindex a page is through a third-party Shopify SEO app like SEOAnt. With just one click, you can index or noindex a page without any technical knowledge or developer assistance.
Steps to index your page using SEOAnt:
- Install SEOAnt’s SEO & Image Optimizer
- Go to Dashboard. Choose On-Page SEO Scan.
- Select the page you want to noindex. Click Optimize Content in the Actions roll-down menu.
- Scroll down to the bottom of the page. Click Show in the More advanced settings.
- Select No index. Hit the button Save. Then you are done!
This is the perfect option for those who want a quick and easy solution for their noindexing needs. In fact, there are other things you can get done with SEOAnt:
- Detailed on-page SEO scan report to guide website optimization
- Automatic detection and redirection of 404 links
- Auto-generate sitemap for faster indexing
- Bulk edit image alt and meta tags
- Shopify AMP
- Analysis of competitor keywords, etc.
Price: A free plan, then Pro and Premium plans start at $29.99/month and $59.99/month respectively.
2. Noindex on Shopify robot.txt liquid
By default, all Shopify stores come with a pre-designed and optimized robots.txt liquid template, which can be edited to control which pages are to be indexed or noindexed. To do this, you will need to access the robots.txt liquid of your Shopify theme. Here are the steps to follow.
On mobile
- From the Shopify app, go to the “Store” section and select “Online Store” from the “Sales channels” section.
- Click on “Manage themes” and select the theme you want to edit.
- Click on the “…” button to open the actions menu and select “Edit code.”
- In the “Layout” folder, find the “theme.liquid” file and click on it to open it.
- Scroll down to the <head> section of the code.
- To prevent the search template from being indexed, paste this code
{% if template contains ‘search’ %}
<meta name=”robots” content=”noindex”>
{% endif %}
- To noindex a page, simply paste this code, and adjust “page-handle-you-want-to-exclude” to the correct page handle::
{% if handle contains ‘page-handle-you-want-to-exclude’ %}
<meta name=”robots” content=”noindex”>
{% endif %}
- Click “Save” to apply the changes.
On PC
- Log in to your Shopify admin and go to Online Store > Themes.
- Locate the theme you want to edit and select Edit code from the action menu.
- Open the theme.liquid layout file.
- To noindex the search template, paste the following code in the <head> section:
{% if template contains ‘search’ %}
<meta name=”robots” content=”noindex”>
{% endif %}
- To noindex a specific page, paste the following code in the <head> section, replacing “page-handle-you-want-to-exclude” with the appropriate handle:
{% if handle contains ‘page-handle-you-want-to-exclude’ %}
<meta name=”robots” content=”noindex”>
{% endif %}
- Save your changes by clicking the Save button.
3. Noindex on the robots meta tag
This method involves inserting the “noindex” robots meta tag into the head section of the HTML of a web page. It has the following syntax: <meta name=”robots” content=”noindex”>.
Similar to above, it also involves coding. Here is how to insert the meta tag:
- Go to your Shopify admin dashboard and navigate to the page you want to noindex.
- Click on the “Actions” button, and then select “Edit code” from the dropdown menu.
- Locate the head section of the HTML code for your page.
- Add the following line of code within the head section: <meta name=”robots” content=”noindex”>
- Save your changes and publish your page. It may take a few days for Google to remove your desired URL from its index.
You can also use this method to reindex a page by changing the “noindex” to “index”. This is useful in cases where you‘ve accidentally noindexed a page and now want it to be indexed again.
4. Noindex via Google Search Console
Noindexing a web page via Google Search Console is quick and simple. Many opt for this option because it can help expedite their page noindexing. Here are the steps:
Firstly, you must have set up a Google Search Console account and have verified your domain.
- Navigate to the “Removals” section on the left of the Google Search Console page.
- On the right-hand side, click the “New Request” button in red.
- Enter the URL you wish to remove.
- Choose the option “Remove this URL only.”
- Hit the “Next” button and then confirm by clicking “Submit Request.”
When removing unwanted pages from your site, using the “noindex” tag is the safest option. Never directly delete them or implement a 500 code, which hurts your website integrity and performances.
How to Check The Noindex Tags on My Pages?
Often when you have inserted the no-index tag in your pages, it’s only a matter of time for Google to noindex them.
You can double-check your noindex tags in these ways:
- Check the page source code: View the source code of the webpage in question and look for the “noindex” tag in the <head> section of the code. It should look something like this: <meta name=”robots” content=”noindex”>
- Use a tool like Google Search Console: If you have added the webpage to your Google Search Console account, you can check the status of the “noindex” tag in the “Coverage” report under the “Index” tab.
- Use a crawler tool: You can use a website crawler tool such as Screaming Frog or DeepCrawl to check if the “noindex” tag is present on the webpage.
How to Check if My Webpages Have Been Successfully Noindexed?
If you want to know if your web page has been successfully removed out of Google index, then try this secret trick:
Enter site:link in the Google search bar.
If your page appears in the SERPs, it means your page so far is still indexed. Wait for a couple days and check further.
If you get results like this, it means the “noindex” tag has been working.

If weeks or even months later, your pages are still being indexed, something is probably up. Don’t worry. There are solutions available to help you. Read below to learn more.
Why does my page with a noindex tag still get indexed?
There can be a few reasons why a page with a noindex tag is still getting indexed by Google:
- Caching: The search engine may have cached (saved a copy) of the page before the noindex tag was added. The cached version of the page will still be indexed until the search engine recrawls and reindexes the page.
Popular websites that receive a lot of traffic and are frequently updated, are usually re-crawled and reindexed daily. But for less popular websites, recrawl and reindexing may happen less frequently. You can try noindexing again in the Google Search Console to quicken the pace.
- Incorrect implementation: The noindex tag may not have been implemented correctly on the page. Double check the page source code to ensure that the tag is properly placed in the <head> section of the code.
- Blocked by robots.txt file: The robots.txt file instructs search engine crawlers on which pages it should or shouldn’t indexed. If the robots.txt file is blocking the search engine crawler from accessing the page that has the noindex tag, the search engine will not be able to see or process the noindex tag. The page will therefore remain indexed.
The solution is to remove or modify the rules in the robots.txt file that are blocking the page. You could also add an exception in the robots.txt file to allow search engine crawlers to access that specific page.
- Third-party sources: The page may be getting indexed by Google from third-party sources such as a sitemap or another website or page linking to it. Here are some possible ways to get around this:
- Remove the page from the sitemap
- Use the rel=”nofollow” attribute on links to the page
- Add a meta robots noindex tag to the page
- Remove any links to the page from your website.
- Use 301 redirect
- Redirects: If the page with the noindex tag is redirecting to another page, it may still get indexed. It’s important to ensure that the redirect is set up correctly to prevent indexing.
How Do Noindex Tags Help My Shopify Store and SEO?
Without the noindex tag, search engines will index all your webpages, even those that you don’t want to be indexed. This can harm your SEO, and exposes your and your customers’ private data to security vulnerabilities. Here are a few of the benefits of using noindex tags on your Shopify store:
- Helps prevent duplicate content: Without the noindex tags, multiple similar pages on your website will compete against each other for rankings. Google also views duplicate content as a sign of low-quality or spam. All this may lead to decreased web visibility.
- Keep irrelevant pages out of search results: Some pages on your website are honestly just not important. Examples include the thank you page, tag pages, etc. Using noindex tags makes sure that customers are only seeing the most relevant content.
- Improves website load times: Noindexing duplicate or irrelevant pages saves crawl budget and make your new or updated pages get indexed faster, also reduce the amount of data needed to be processed, increasing your website load time. Since search engines take page load times into account when ranking websites, this boosts your SEO as well.
- Keeps private pages to unique customers or yourself only: Noindex tags are useful for pages that contain sensitive information such as login pages, account pages, and private sales pages. By preventing search engines from indexing these pages, only authorized individuals have access to them.
- Hide sold out, discontinued products: If indexed, these pages can show up in search results, making your visitors confused. Since you can’t can’t deliver what they’ve purchased, it is compromising your brand reliability. Noindexing them definitely helps!
FAQ
- How do I remove a noindex tag from my page?
Remove the tag from the page’s source code in your store liquid file, or use a tool like SEOAnt to remove it.
- Can Google ignore a meta noindex tag?
It is highly unlikely, but it can happen if the tag is improperly implemented or if Google’s crawlers encounter an error when trying to access the page.
- Noindex VS Nofollow VS Disallow VS Noreferrer VS Noopener
Noindex is a meta tag that tells search engines not to index a page. Nofollow is a link attribute that tells search engines not to follow a link.
Disallow is a directive in robots.txt that tells search engines not to crawl a page.
Noreferrer is a link attribute that tells the browser not to send the referrer header when navigating to the linked page.
Noopener is a link attribute that tells the browser to open the linked page in a new tab without access to the current tab’s browsing context.
- How can you tell if a website is using noindex?
Check the source code of the website’s pages for a “noindex” meta tag, or use a tool like Google Search Console to check the pages’ index status.
- How long does it take for noindex to work?
It varies depending on the frequency of the search engine’s crawling, but it can take anywhere from a few days to a few weeks for a noindex tag to take effect.
- What’s Google’s policy to noindex tags?
Google generally honors noindex tags, but they can ignore them if the tag is improperly implemented.
How to fix the “Shopify indexed though blocked by robots.txt” error?
Did you just get an “Indexed, though blocked by robots.txt” message from Google Search Console? You don’t know what it is, if it is serious, or what to do? No worries! In this article, I will show you all there’s to know about this issue, and guide you step-by-step on the fixes. Read on!
What is Shopify robots.txt?
Before everything else, let’s talk about what the robots.txt is first, as this is where all the “why” and “how to fix” will be coming from.
Shopify robots.txt is a file that instructs search engine robots (also known as “crawlers” or “spiders”) which pages or sections of a website to not crawl or index. For example, if your robots.txt file includes the line “Disallow: /checkout”, the robot will not crawl or index any pages within the checkout section of the website.
As a Shopify store owner, this is where you join the conversation. Shopify automatically generates a robots.txt file for each store, which can even be edited and customized by the store owner in the Shopify admin. Therefore, you get to control which web pages are to be indexed. And in case you didn’t know, this can greatly affect your store’s SEO performance. But first, let’s see how to access this said file.
Where can I Access Robots.Txt File in Shopify?
You can access the robots.txt file in your Shopify store by adding “/robots.txt” to the end of your store’s UR. For example, if your store’s URL is “www.abcstore.com”, you can access the robots.txt file by visiting “www.abcstore.com/robots.txt” in your web browser.
Or simply log in to your Shopify admin. Next, go to Online Store > Preferences > Search engine listing preview > Edit robots.txt”
Shopify’s Default Robots.txt Rules
Shopify’s default robots.txt file automatically prevents Google from indexing pages that are not relevant to searches or could cause duplicate content. And of course, this is good for your store’s SEO.
By default, Shopify’s robots.txt file includes the following instructions:
- Disallow: /checkout
- Disallow: /cart
- Disallow: /orders
- Disallow: /account
- Disallow: /search
- Disallow: /apps
- Disallow: /services
These mean, any pages within the checkout, cart, orders, account, search, apps, and services sections of your store shouldn’t be indexed.
Additionally, the robots.txt file can include the instruction “Allow: /” “Sitemap: https://mystore.com/sitemap.xml” which points the robots to the store sitemap, offering a list of all URLs on the website that should be indexed.
By limiting the number of less-value or redundant pages indexed, search engines can direct users to more relevant pages, attracting more targeted traffic.
So far so good, Shopify!
What Does “Shopify indexed though blocked by robots.txt” Mean?
This means that some of your pages are not meant for indexing but still get indexed by Google, even after you have blocked them in your store’s robots.txt file. Whenever this happens, you can tell your instructions in the robots.txt file are not being followed.
This can happen for various reasons, and here are some:
- Misconfiguration in the robots.txt file: The instructions provided in the file may be incorrect or not properly formatted.
- Robots.txt file deletion: The robots.txt file may have been accidentally deleted or removed.
- Robots.txt file not accessible: The robots.txt file may not be accessible by search engine crawlers. If the server is not configured properly. This could be due to a misconfigured firewall, incorrect file permissions, or other server-side issues.
- Third-party apps: Some third-party apps can affect the robots.txt file and cause the pages to be indexed despite being blocked by the file.
- Sitemap: Even if a page is blocked by the robots.txt file, it may still be included in the website’s sitemap, which can lead to the page being indexed by search engines.
- Links on other pages or dynamic URLs: Despite being blocked by the store’s robots.txt file, some pages may still be crawled and indexed by search engine robots through links on other pages or dynamic URLs.
Some bloggers may claim that it’s not a big deal. But that’s not entirely accurate. It’s likely that Google will de-index the page in the future, which means it will no longer be included in Google’s search results. If this happens to be an important page to drive in traffic to your store, obviously, you face decreased visibility and revenue.
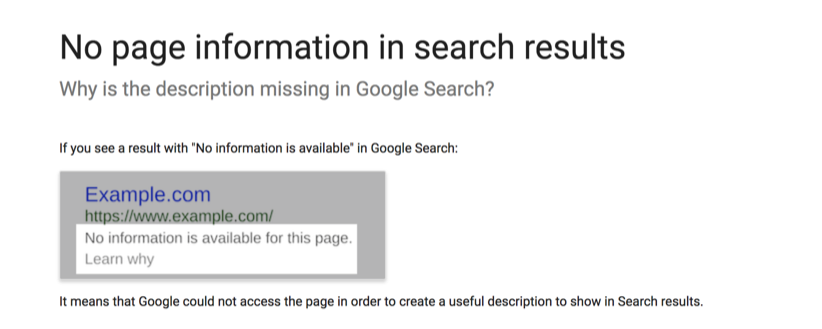
Alternatively, Google may show a warning message in search results instead of your meta description. And that can negatively impact your brand’s reputation. I mean, just take a look at the example below:

Stuff like this gives potential users the impression that you aren’t professional, nor are you a top reliable brand.
Maybe you do want those pages to be indexed, but they were accidentally blocked on the robots.txt file. Or maybe you blocked them on the robots.txt file on purpose, but Google managed to index them. Either way, the first step is to check which URLs are having these issues before making any moves.
Note: keep in mind that this is not a small issue, and it can have a significant impact on your store’s SEO. So, don’t hesitate to reach out to an expert who can help you identify and resolve these issues.
How to fix the “Indexed, though blocked by robots.txt” issue?
To fix the “Indexed, though blocked by robots.txt” issue, you need to ensure that the file is correctly blocking the pages that you don’t want to be indexed. You can check the syntax of your robots.txt file or use the Google Search Console to check which pages are being blocked
Step-by-step Guide to Fix the Issue
Here is a short guide to fix issues related to the robots.txt file by using Google Search Console:
- Export all URLs in warning from Google Search Console: Go to the ‘Coverage’ report and select the ‘Valid’ tab, then select ‘Download’ and choose ‘All URLs’ to export a list of all URLs that are being blocked by the robots.txt file.
- Decide if you want them indexed or not: Review the list of URLs and decide which pages you want to be indexed by search engines.
- Unblock the URLs: Identify the rules blocking the pages in the robots.txt file and remove or comment out those lines.
- Test the changes: Use Google’s robots.txt Tester to test the changes and ensure that the pages you want indexed are no longer being blocked.
- Validate the fix: Hit the “VALIDATE FIX” button in the Google Search Console to request Google to re-evaluate your robots.txt against your URLs.
- Monitor the results: Monitor the coverage report for any other warning or errors.
Caution
Editing your robots.txt file is not difficult. But one misstep can have a significant impact on your web page indexing and SEO rankings. This kind of risk and the technicality involved is why you shouldn’t edit the robots.txt file yourself. It’s best if you hire professional services.
What Pages Shouldn’t be Blocked by Robots.txt?
Some pages are too important to be (accidentally) blocked. If so, you are likely to face decreased traffic, customer trust and search visibility. They include:
- Homepage: This is the most important page of your website and search engines should always be able to crawl and index them.
- Product pages: These pages contain important details about your products and should be indexed so that customers can find them via organic search and make purchases .
- Collection/category pages: These pages group together similar products and also help customers navigate your website. They should also be indexed.
- Blog pages: If you have a blog on your website, these pages should also be indexed as they can help drive traffic to your site and improve your SEO.
- About Us page: This page provides information about your company and can help build brand authenticity and establish trust with potential customers.
- Contact Us page: This page tells search engines and customers how to contact your business and should be visible.
- Privacy Policy and Terms of Service pages: These pages explain how your business handles customer data and should always be within the reach of search engines and customers.
- Sitemap page: This page provides a map of your website and can help search engines more easily crawl and index your site.
To cut it short, any page that contains valuable information that you want search engines and customers to be able to find shouldn’t be blocked. Other examples are customer reviews pages, FAQ pages, etc.
If you find that any of these pages is blocked by robots.txt, you should remove it from the robots.txt file and submit a new sitemap to Google for reindexing. But how about pages that should certainly be unindexed from the Robots.txt file? Let’s discuss those.
What Pages Should be Blocked by Robots.txt?
Not every page should be accessible to all. Some pages on your website contain sensitive or duplicate information that you don’t want search engines to index. Otherwise, you may trigger Google penalties or loss of customers. Here are a few examples of pages that you may want to block:
- Login pages: These pages typically contain customers’ private information and only authorized users should be able to reach them.
- Shopping cart and checkout pages: These pages may contain sensitive user details such as customer billing and shipping address, and should be blocked for security reasons.
- Pages with duplicate content: If you have multiple pages on your website with identical or similar content, it’s a good idea to block the duplicate pages and make the original version stand out.
- Pages with expired or low-quality content: If you have pages on your website that don’t offer much value to users, it’s best to block these pages. Such pages include: pages with outdated content, test pages, those under development, pages with expired special offers, media or PDF files, etc.
If later you want to unblock the blocked URLs, you will need to update your robots.txt file, and resubmit it to Google Search Console.
3 Effective Ways to Add Trust Badges to Your Shopify Store
Remember how hard it was for you to trust a stranger on your first encounter? Quickly think about a relationship you have solid trust in and how long it took you to get to that trust level. Done? Now, follow me.
That same feeling occurs to your existing and prospective consumers whenever they visit your Shopify store. Humans are naturally sceptical about where to place their trust especially when it comes to parting away with their hard-earned money.
Hence, they need constant, honest and timely reassurance that trusting your business, product or service won’t become a thing of regret for them. And guess what? The trust badges are just the right fit for your Shopify business’s entrusting needs.
In this article, you will be reading about four different and effective methods of adding these trust badges to your Shopify store. Sounds useful already? Read on.
What are Shopify trust badges?
Shopify Trust badges are symbols, icons or even logos specially made for display in a Shopify online store to demonstrate the business’s commitment to security and trustworthiness. These badges help boost your store’s sales by increasing the customers’ trust in the business. They signify that your store has specific features that boost buyer-seller trust and are authenticated by Shopify which is the hosting e-Commerce platform.
Trust badges can be used to reassure your customers that their personal information and credit card information are safe when shopping at your Shopify store. It also shows that your store is taking steps to protect customer data.
You can see this as McDonald’s endorsing a smaller hamburger business with tags and promotional badges. It would surely increase their trustability and perception on the side of the consumers.
Hence, the Shopify trust badges work similarly. It helps generate more revenue through improved brand trust and loyalty in your customer base. They are usually placed on the product page, at the end of a checkout page or at the footer of the Shopify website page.
Overall, displaying Shopify trust badges guarantees that your store can help customers feel more confident in completing a purchase and show that you take customer security seriously.
Types of trust badges and where to put them on Shopify?
There are several types of trust badges you can add to your store on the Shopify platform, such as shipping, refund, return, promotions, taxes, warranties. Although all of these trust badges serve different and specific purposes, they can still be used simultaneously on your shopping platform. You will read about the most popular and effective ones below. Follow thoroughly.
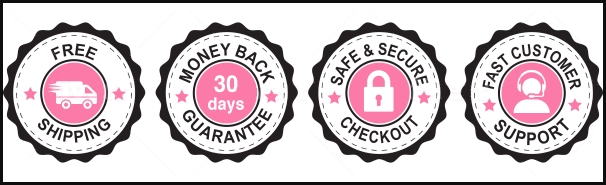
- Money-Back Guarantee Trust Badge
This is one of the most effective types of trust badges for eCommerce stores including Shopify ones. It is usually time-bound for 15 days, 30 days, etc. This means that if the buyer doesn’t find the best use for the product, they can return it and get their money back, but the product must be in perfect condition and must be returned in time. This trust badge can be best placed on the checkout page.

Source: Landerblog.
The money-back guarantee trust badge enhances customers’ trust, reduces the risk of purchase and cart abandonment, and eliminates the fear of buying the wrong product for the customers.
- Free Shipping Trust Badge
Psychology proves that humans are naturally motivated to take action when an incentive or freebie is involved. Therefore, this trust badge milks the same psychology to generate more conversions for a store or business online.

Source: Freepik
This trust badge can be added to the header of a website, the footer of a website or even the checkout page for great visibility.
- Free Return Trust Badge
This trust badge uses a similar psychology to the ‘free shipping trust badge’. The simple act of giving freebies. The only difference is that this badge signifies that a customer can return any purchased product without additional cost for logistics whatsoever. It helps show that your store or business establishment believes in the quality of your product enough.

Source: Freepik
In this case, displaying a ‘free return’ trust badge shows that the store is ready to take its product back from a customer at any discrepancy in its promised utility. It can be displayed on the footer and/or header of the website, or the checkout page.
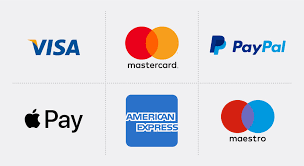
- Payment Platforms Trust Badges
These types of trust badges are usually made to directly protect and improve your customers’ financial security status while buying online. The payment platform’s trust badge leverages trusted financial solution brands to boost your store’s trustability amongst its visitors and customers.
Source: Mason
It includes using recognised brands like PayPal, Visa or Mastercard for its payment options. This way, the store can ride on the back of these payment platform giants, offer great payment security to its customers, boost sales and increase its brand trust in the market. This trust badge can be placed at the footer of your website or store page for improved effectiveness and visibility.
- Awards Trust Badge
This trust badge showcases various awards and recognition certificates a business or store has in the form of a badge on the store shopping page. The award trust badge helps solidify the store’s relevance and evidence of great quality delivery in the market.

Source: TrustPulse
Concurrently, it provides customers with more reasons to trust a business or store’s credibility. The footer part of a website is a great place to display this kind of trust badge too.
- Product Features Trust Badge
This trust badge highlights all the important and benefitting features of a product. For example, a footwear product made from sustainable materials can emphasise its features in a trust badge like 100% Sustainable, 100% Safe, Zero Emission; 100% Green Energy, 100% organic, etc.
Source: Quickreply.ai
It supports the product offering promised during product marketing. This badge can be placed on the product page for aligned purposes and effectiveness.
- Partners Trust Badge
Partnership is another great form of promoting and boosting a business’s revenue reasonably. And this style of business promotion has been around since time immemorial. Leveraging your partnership with revered, successful and recognised third-party businesses can boost your credibility.

Source: Delante
For example, Google can partner with Shopify and create a Google-verified eCommerce platform for Shopify. This would bring a lot of traction, increased trust and sales conversions for Shopify. It can be placed at the footers and headers of a website for great visibility.
How do I add trust badges to Shopify?
A Shopify store without trust badges is perceived to be less secure than stores that have. This can scare off your page visitors and customers which directly leads to you losing conversions and sales. Therefore, it is important for you to know how to add these badges on your store.
Use third-party apps on Shopify
This is the easiest way. Many online Shopify apps provide a range of trust badges, and makes it a breeze to add them to your pages.
Take the Trust.Me app for an example
It is completely free, ranked No.1 in the trust badge section of the Shopify store. This app offers you 50+ free badge templates, and allows you to upload your own badges.
It takes only one click to add your selected badge onto your desired pages. Here are the steps:
- Install Trust Me app on your store. Choose a badge type.
- Start customizing the header, font, alignment, badge size, color, animation efforts and other details. Meanwhile, you can preview all the live changes.
- Once finalized, click Save on the top right corner.
Edit payment options in the footer on Shopify
Most Shopify stores support enabling payment icons in the footer, making them visible to your customers across all pages of your store website. Here are the steps:
- Visit the Theme editor on your Shopify store.
- Proceed to tapping the Footer button.
- Then, check the Show payment icons on the new displayed page if it is meant for the payment platforms trust badges..
- After adding your trust badge under this category, tap Save to effect your changes.
Note that this customisation works for all Shopify free themes. If you wish to add or delete your own payment badges (for brand consistency for example), it is better to edit your theme code.
- Log into your Shopify store account.
- Proceed to the Online store segment of the page.
- Tap the Theme section under the Online store segment.
- Under the new segment, tap the Actions button again.
- Afterwards, click on the Edit code button.
- From this new page, tap the footer.liquid file option.
- Use the find button to search for this code {% for type in shop.enabled_payment_types %}.
- Replace the code in step 7 with this {% assign enabled_payment_types = ‘visa,master,american_express,paypal’ | remove: ‘ ‘ | split: ‘,’ %} {% for type in enabled_payment_types %}.
- After pasting the code in step 8, click on the Save button to effect your changes.
The above steps are specially made for desktop users. Go here to read more on how to edit your footer for iPhone and Android.
Create your own badges and add it via Shopify theme or coding
Designing your own trust badge image gives you the flexibility to display the exact information you want on it, compared to the rigid and fixed style on the available trust badges template. So, if you want to take control of the visual direction of your trust badge, you can also create them from scratch and add them to your store by yourself.
Add trust badges to product pages via coding
Manually adding a trust badge to your product pages like adding a picture won’t be visually appealing. It’s best you add them via your theme liquid file. For this, you would first need to upload your new trust badge image.
- Visit your Settings page.
- Tap the Files button.
- And on the newly displayed page, choose Upload files. Upload your ready-made badge images.
- Copy the URL of your trust badge’s new image.
- Proceed to the Online store segment of the page.
- Tap the Themes section under the Online store segment.
- Click the Actions button on the top right side of the page.
- Afterwards, click on the Edit code button.
- From this new page, tap the Product page code option under Sections.
- Search product-template.liquid and edit it.
- From here, fill in the copied URL code of the new image you uploaded on the Settings page from step 4.
- After pasting your chosen code, click on the Save button to effect your changes.
Add badges onto the cart page via Shopify theme
66.5% of visitors to a website’s cart pages end up abandoning their chosen items. Surely you don’t want this for your store. Time to win your customer’s trust on your cart pages with certified trust badges. These two ways can help you do this easily.
- Log into your Shopify store account for total access.
- Proceed to the Online store segment of the page.
- Tap the Theme customisation section and find the Cart page.
- On this page, find the option to Select image.
- Afterwards, Upload your secured Shopify trust badge image.
Then, you are good to go.
Add badges onto the cart page via coding
If your theme doesn’t support adding badges onto the cart page, then try editing your liquid file. You must first upload your images to your store account settings page too.
- Visit your Settings page.
- Tap the Files button.
- And on the newly displayed page, choose Upload files. Select from your local drive and upload your readymade badge pictures.
- Copy the URL of your trust badge’s new image.
- Then, proceed to the Online store segment of the page.
- Tap the Themes section under the Online store segment.
- Under the Themes segment, tap the Actions button again.
- Afterwards, click on the Edit code button.
- Go to your Cart page and find cart.liquid under the Templates segment.
- Or search cart-template.liquid under the Sections options to edit it..
- From here, fill in the copied URL code of the new image you uploaded on the Settings page from step 4.
Then, you are all set.
Add badges on the checkout page via Shopify theme
Most Shopify themes allow you to add badges directly on the checkout page. Therefore, no coding is needed.
- Visit your Settings page on your Shopify store account and choose the Checkout option on the left listed column.
- Tap the Customise checkout button.
- From here, go to the Checkout page.
- On the Checkout page, you will need to click the Select image under the Logo section.
- And on the newly displayed page, choose the Upload button to add the document of your trust badge image.
- After the upload, the added trust badge automatically displays at the top of the Checkout page.
FAQs about Trust Badges
- Do trust badges increase sales?
Yes, they do. A survey of online shoppers shows that 48% of the respondents get reassurance from trust badges they see on store pages. And this directly influences their purchasing decisions positively. Therefore, trust badges do increase conversions for businesses and e-commerce stores.
- Is it a must to place trust badges on places like website footers and headers, checkout pages, product pages, etc?
It is not compulsory, but it is important to place them in these places if a store truly wants increased sales. Why? It is simply because these places are the hotspots for buying page visitors. Therefore, they have higher visibility for the right audience for a store. And they directly contribute to the conversion rates of a store.
- What are the best free trust badge apps to use for a Shopify store?
Simply search “trust badges” in the Shopify app store, and you will get a list of trust badges apps available for Shopify stores. The top ones include Trust Me, Avada, Trust Badges Bear.
Wrapping up
Regardless of the numerous types of trust badges highlighted above, it is not compulsory to use them all. Remember, the result of trust badge addition to your store shopping page is increased customer trust. Hence, if it is just one or two trust badges that are relevant and available on your products and store, stick with just these.
Also, you can always shuffle and monitor the performances between these types of badges in usage to discover the best fit for your Shopify store. Just do not forget that you only want to make more sales, but not lie or promise what your business can’t deliver to your store page visitors and customers.

6 Best Practices for Product Description Optimization
A product description is a good SEO-friendly strategy for boosting your eCommerce website, and there’s a right way to do it.
Besides providing your users with a superb customer experience, optimizing your product descriptions boosts the overall visibility of your eCommerce store and website online. For this reason, it’s essential that you get it right.
In this article, I’ll be divulging the secrets of the best product description optimization practices. I’ll show you how you can implement strategies like audience analysis to achieve great SEO-friendly results.
Without any further ado, let’s jump right into the good stuff.
What Is a Product Description?
As you may have guessed, product descriptions are the write-ups you use to explain what your products are, their features, benefits, the problems they solve, and why they are the best products on the market for solving that problem.
They are those blocks of text in your product pages that effectively describe your products to your customers.
The truth is, even though your customers need your product descriptions, you also need them badly. Product descriptions help you get more conversions and purchases.
A product with no description at all will get fewer purchases than one with a description. Even though the high-quality pictures of your products go a long way towards increasing your sales, you also require those descriptions too.
Product descriptions answer every possible question a prospective customer may have about your product.
Additionally, product descriptions help the shopper make a more informed buying decision, especially when they have doubts about your products. That will prevent abandoned carts and reduce the number of inquiry emails you’ll have.
Finally, product descriptions help your SEO rankings indirectly. That’s because, with clear and detailed product descriptions, customers are less likely to leave your webpage for your competitors because of insufficient information. That’ll reduce your bounce rate, which will boost your rankings on search results pages.
Why Do You Need a Product Description?
Product descriptions are important for the following reasons:
It creates a top-notch customer experience.
A good strategy for optimizing your product descriptions is to create a top-notch customer experience.
When you provide detailed and unique content for your potential shoppers, you enhance the optimal experience they will have when they visit your website’s product pages.
You can optimize your customer experience by providing high-quality and detailed product description pages that will boost the buying experience for your customers.
It Improves Search Engine Rankings
Besides creating unique and high-quality articles and blog posts for SEO purposes, you can also optimize your product description pages and make them SEO-friendly.
That way, you make your SEO campaigns much more likely to succeed. You have a higher probability of ranking higher on Google search engine result pages.
That’ll go a long way towards increasing the online presence of your eCommerce store, boosting organic traffic and driving up sales.
More Sales
When you create product descriptions that are rich with keywords, your product pages have a higher chance of featuring on search engine results pages.
They get in front of prospective customers more, which means more traffic and more sales for that particular product. Product description optimization garners high-quality leads for your business, which helps in sales maximization.
Product Description Optimization Techniques for SEO
.jpg)
Now that you know what the product description is and why it is important, let’s dive into the meat of this article.
1. Get to Know Google’s Algorithm
Google is the most popular search engine on the internet and takes up 86% of the eCommerce market.
If you’re serious about optimizing your product pages, then you need to comply with Google’s rules or else you’ll be missing out on a great amount of traffic.
Here are some of the most important tips to follow:
● Familiarize yourself with Google Indexing: Indexing is the process whereby Google Bots scan through your web pages to figure out what your content is about. The Googlebot goes through your written content, images, videos, and other metadata to find relevant information that matches a consumer search query.
If your content matches the search query, then the bots will add your website to the search result pages. Therefore, create concise, meaningful, and SEO-friendly meta titles so that Google bots will understand your content better and faster.
● Apply meta tags and meta description: This point also goes in line with the above. Meta tags and meta descriptions help Googlebot understand your website better. Meta descriptions are relevant because Google will feature them on the page results.
2. Target the Right Audience
When consumers visit your website, it’s because they think they can find content related to their search query on your product pages.
Therefore, you must craft a product description that will attract the right customers because they are more likely to buy your products if your content resonates with their search query.
Carry out a detailed audience analysis and find out the customers that are best for your business.
Here are a few tips:
● Assess your current customers: A good way of conducting audience analysis is by identifying who your current customers are. Examine their behavior, demographics, and other details you can research that’ll contribute to more sales. That’ll provide you with a clearer picture of whom you should target.
● Engage in competitor research: When you are not sure about how to go about audience analysis, a good place to begin is to assess who your competitors’ customers are. That way, you’ll know who your target audience is because they are your competition for a reason.
● Customer survey: Carrying out a customer survey is a very strong arsenal in your audience analysis armory. By getting the opinions and thoughts of your actual customers, you get better insights into their interests, demographics, values, and how you can improve your brand.
When you complete your audience analysis and know who your target audience is, make sure your product pages, copy, and overall content are directed at them. That will provide your customers with an enhanced shopping experience.
3. Include Keywords in Product Descriptions
This strategy is very potent because it provides Google bots with the tools they need to index your product pages and rank them.
Featuring keywords in your product descriptions and titles helps the bots understand your descriptions better and faster.
During your keyword research, look for keywords and phrases that customers are likely to search for and include them in your product titles and descriptions.
Long-tail keywords play a key role in this process because they are very specific.
The customer that uses this type of keyword is further down the sales funnel and is very likely to purchase if your product is relevant to the search query.
4. Use Extensive Product Descriptions
Make sure your product descriptions are very detailed because you’re creating them for your customers.
They should tell your prospective buyers about the products, what they are, the features, the benefits they’ll get from using the product, and why they should buy from you and not from your competitors.
Remember to include high-quality product images. Try to think of any potential questions that your customers may ask and answer them in your product descriptions.
You don’t want your shoppers to have any doubts concerning your products because that will increase the chances of abandoned carts.
5. Write Unique Product Descriptions
Never create duplicate content for your product description, as this will work against what we’re trying to achieve.
Google frowns on duplicate content and will rank your website low if you are a culprit.
Take time to create product descriptions that are unique and different from the content you have on other web pages. They should also be different from those of your competitors.
You can create unique content by employing different people to create product descriptions for you. That makes it harder to create similar product descriptions.
Additionally, check your content online for duplicates and make corrections where relevant.
6. Landing Page Optimization
Your landing pages are one of the most important pages on your website because they help your clients find the products they searched for, and for this reason, this strategy is important.
If you don’t optimize your website’s landing pages, your potential buyers will not find it easy to get the products they need. That’ll increase your bounce rate, which will directly affect your SEO rankings.
So, how can you optimize your landing page?
● Use clear headlines: Use clear and succinct headlines at the top of your landing pages so that visitors will know exactly what your products are. Otherwise, they’ll leave your site faster than they came in.
● Your call-to-actions should be clear: Your product descriptions and other SEO strategies are useless if you don’t have a clear and compelling call-to-action. It is one of the critical elements you need to have on your landing pages. Place them strategically, use clear and compelling words, and choose appealing colors. These can be a dealbreaker for you.
● Offer personalization to your customers: 44% of online shoppers value personalization so much that they will go from one brand that doesn’t provide it to one that does. The reason is that personalization boosts the entire shopping experience. Place your landing page in a specific location, offer product suggestions to your customers, and use language that they understand.
Conclusion
Product description optimization is the process whereby you describe your products in such a way that they are more appealing to customers.
It is an important part of your marketing strategy because it helps to direct more organic traffic to your webpage and increase conversions. Start optimizing your product descriptions today and you’ll see the difference it’ll make.

How to Add a Favicon to Your Shopify Store? (Updated 2023)
Did you know that a favicon can promote brand awareness for your Shopify store? That’s right. That tiny icon next to the web address on a browser tab can help imprint your brand logo and name in the minds of target users who visit your Shopify page. In turn, this can lead to new or repeat customers.
That said, would you like to know how to add favicon to Shopify? This guide is the perfect place to learn. Keep reading.
What Is a Favicon on Shopify?
Favicon means “favorite” and “icon” combined. It is usually a small square image, pixel icon, or brand logo shown next to the title tag and web address in any browser tab.
For a Shopify favicon, you are allowed to use any image, but the store logo is often the best option. It acts as a strong branding message, also a cue for visitors to remember your store. Once added, your brand gets more visible to visitors on the address bar.
Visitors can use the favicon to identify your page. Alternatively, they may use it to locate your store’s website in their bookmarks list if they bookmark your site.

Why Do You Need a Favicon for Your Websites?
A favicon may seem like a tiny thing, but it can make or break your online store. Wondering why? Below are some reasons:
- To build credibility and trust
If your Shopify web pages don’t have a favicon, browsers will display a generic gray icon or the default blank document instead. In such a case, when a user is comparing your store and a competitor’s, they are likely to have little faith in yours. Hence, having a favicon can help improve credibility.
- Increases brand recognition
Favicons are like your website’s ID, helping visitors recognize your site among many tabs. Also, since images are easier to recall than texts, users may remember your store’s favicon before they read the page title. Logos can ingrain themselves into a customer’s mind quickly. Once this happens, it is easier for the client to remember your company and its name.
- Follow up visits
People are likely to revisit your Shopify store if they recognize your favicon in search results, bookmarks, or even browser history. For example, when a browser history has multiple entries with long names, people will likely click on a familiar icon.
- Save user’s time
If a visitor comes across your Shopify page in a hurry, he may decide to bookmark and check it out later. Due to the rush, he may only have time to notice your store’s favicon. This makes it easier to identify the page later from his bookmarks and saves him valuable time.
Best Shopify Favicon Size
16*16 or 32*32 pixels is the perfect Shopify favicon size. However, if the image you use is too large, Shopify will automatically scale it to 32*32 at upload time. So you shouldn’t worry too much about the image dimensions.
However, since favicons are displayed in tiny sizes, ensure the image or words are of high resolution.
Best Shopify Favicon Format
Shopify favicons support JPG, PNG, GIF and ICO image files. ICO is usually more popular, because it’s smaller and supported by all major browsers. PNGs are used more commonly for Android and iOS devices.
Other file formats may not show on internet explorer.
It also depends on your theme. Some may only accept .png or .ico files.
How to Add a Favicon to Shopify?
There are two ways to add a favicon on Shopify: directly via the theme settings, or by editing the code in the theme.liquid file. Let’s check each below.
Add a Favicon in the Theme Settings
You can access Shopify theme settings via a computer or a mobile phone. The steps differ in each case.
On Desktop
- Go to the Shopify Admin panel, and then click Online Store > Themes.
- Locate the theme you intend to edit and click Customize.
- Go to Theme Settings > Favicon.

- Under Favicon image, click Select image, then do one of the following:
- Click the Library tab to select a picture you already uploaded to your Shopify admin.
- Click the Library tab, then hit Upload to pick an image from your local storage.
- To add alt text to the favicon image, click Edit, then enter a brief description in the Edit image window and hit Save.
- Click Save to add the favicon.
On Mobile (For Android and iOS)
- Open the Shopify app and tap Store.
- Navigate to Sales Channels and tap Online Store > Manage themes.
- Locate the theme you intend to edit and tap Customize > Edit > Theme Settings > Favicon.
- Under Favicon image, press Select image, then do one of the following:

- Click the Library tab to select a picture you already uploaded to your Shopify admin.
- Click the Library tab, then hit Upload to pick an image from your local storage.
- To add alt text to the favicon image, click Edit, then enter a brief description in the Edit image window and hit Save.
- Click Save to add the favicon.
Tip:
Some Shopify themes allow you to add alt text to your favicon. Browsers then display the alt text when the favicon can’t load. Screen readers or voice assistants can also read out the alt text to describe the favicon image to visual users.
Add a Favicon in the theme.liquid File
This method is more complex than adding the favicon via settings. It requires editing your store’s code.
Before you start, ensure your image’s file name consists of the correct name and extension: i.e., my-favicon.ico or my-favicon.png. If it doesn’t, it will display incorrectly.
Steps:
- Go to your Shopify admin panel, then click Online Store > Themes.
- Locate the theme and click Customize.
- Press Theme Settings > Theme Actions > Edit Code.
- Scroll down, then click Assets > Add New Asset.
- Press choose a file, select the image file you want to use, then click Upload asset.
- Scroll up to the Layout folder, select it, then click theme.liquid. Code will be displayed on your screen.

- You need to find the </head> tag. To locate it quickly, press ctrl + F, type ‘</head>’ into the search bar, and hit enter.
- Paste the following code above the </head> tag, <link rel=”shortcut icon” href=”{{ ‘favicon.png’ | asset_url }}” type=”image/png” />. If your image has a .ico extension, replace favorite.png with favorite.ico.
- Click Save.
How to edit, change, update the favicon on my Shopify store?
The steps are the same as adding a favicon. Either navigate to your Shopify theme settings and replace the image, or change the asset and asset URL in the theme.liquid file.
Once you add or change your store’s favicon, refresh the page, then check if the favicon is displayed. If not, don’t panic, I have some solutions below to help you troubleshoot.
What to Do if My Favicon Isn’t Appearing on My Shopify Store?
If your favicon doesn’t show up, first check if it’s in the correct format (.png, .gif, or .ico), or of the right size (16*16 or 32*32 pixels). Then check if you named it correctly (favicon.png, favicon.ico, or favicon.gif).
You can also try refreshing the page just in case the favicon is cached by your browser. Refreshing the page can show an updated version, especially if you’ve just uploaded it.
If this doesn’t work, try clearing your browser’s cache and cookies. This often fixes the issue.
If you are still experiencing trouble, contact the Shopify support team for help.
How to Create a Favicon for My Shopify Store?
Since Shopify lacks a built-in favicon generator, you need to create your own. Here are 4 different ways to do that:
- Use a third party favicon generator – Enter “free favicon generators” on the Google search bar. Select one from the search results to generate your favicon in seconds.
- Use an image editor – This is a good option if you have image editing skills or have a designer onboard, with tools like Photoshop, Fireworks, Corel paint, or more.
- Use your company logo – This method is the easiest one. You don’t need to remake an icon from scratch but simply resize your existing logo to 16×16 or 32×32 pixels. Plus, using your logo as the favicon increases your brand recognition too!
- Use free, open-source software – These include tools like Luminar, Pixen, GIMP and Inkscape, among others. However, you need some coding skills to use them, which can be challenging.
Conclusion
Favicons on Shopify can convince a client to buy from your page or even come back to your site after the initial visit. After reading this guide, you now know how to add, edit, change, update a favicon in Shopify. Take your time to create and upload a unique and highly recognizable favicon!
How to Boost Visibility & Sales with Shopify Structured Data
Now, have a look at these two types of search results. Which one would you want to click?
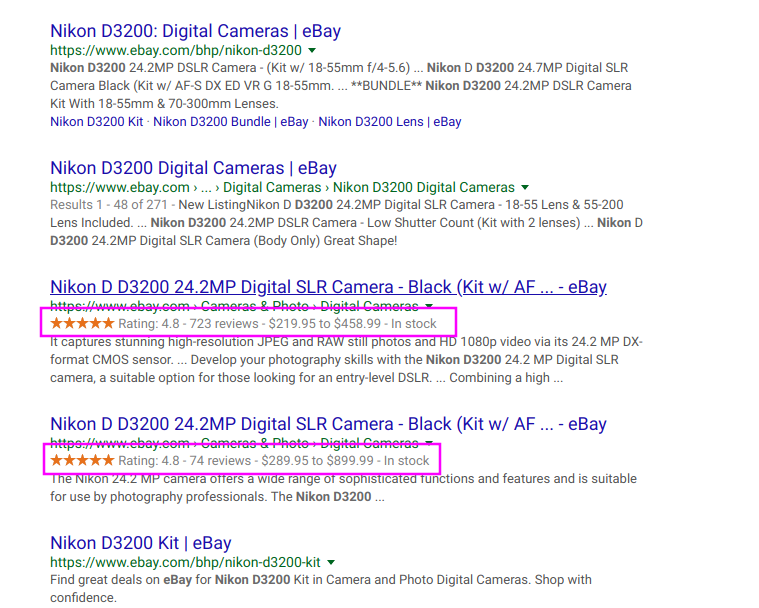
Most likely, you’d go for the ones below, right? It’s more visually appealing and looks more trustable, with reviews, stars, etc all well-organized in one place, while the other one simply comes with a link and a short description.
As a Shopify store owner, don’t you want the same for your website? This way, it becomes easier for customers to find your pages, and even want to click on them. Using structured dathe ta like above is one simple way to achieve this purpose. It also helps Google understand the content on your website better and display it in rich snippets.
If you are unsure what structured data is and how to implement it, then this guide is for you.
What is Structured Data?
Structured data is the use of a specific type of formatting and coding to present valuable information about your web page, including:
- Product titles
- Product description
- Pricing
- Product images
- Product availability
- Shipping options
- Product variants
- Reviews and ratings
- Founder
- Subsidiaries
- Address and contact info
- Social media
With this data, search engines can better interpret your page, match it more accurately with the target searchers, and display it in a way that is informative and attractive to them in the SERP listing.
If you want to take your Shopify store to a new level in search traffic, you can consider using structured data on your store.
How Can Structured Data Improve your Shopify Store?
Structured data is not a ranking factor itself. Yet it has many amazing benefits you shouldn’t miss.
Higher click-through rates with rich snippets: Rich snippets are enhanced search results that include additional details about a page, such as ratings, reviews, and product details. This can help your store stand out in the search results and attract more clicks.
Build up brand authority: If your website has consistently authoritative high-quality content, your structured data may be included by Google into its Knowledge Graph Card. The Knowledge Graph displays information about prominent entities, such as businesses or organizations, in search results. Being a part of this feature can boost your brand’s reputation and establish trust among potential customers.

Improved SEO performance: Structured data gives Google a breakdown of your page’s layout and content, helping Google understand and classify your pages better. This will ultimately lead to more accurate search results for users, potentially raising your rankings.
Dominate local search: You can use physical location to your advantage with structured data by marking up your business information, such as your address with the schema.org “LocalBusiness” type. This can help your store show up in local search results and attract more foot traffic to your store.
Faster indexing: Structured data provides additional details about your webpage in a format that is easily interpretable by search engines, leading to quicker and more comprehensive indexing.
Enhanced customer experience and conversions: Structured data on your Shopify store allows visitors to easily find the detailed info they may need. This includes answering common questions like:
- Your store’s reliability, as shown by its 5-star rating.
- Your store’s location in relation to the customer.
- Your store’s hours and contact information, making it easier for them to connect with you and make purchases.
- Product specifications, dimensions, material, size, reviews, color, and price.
- Product availability, discounts, promotions, and special offers.
- High-quality images
All these can help customers make informed decisions about their purchase, leading to a better overall experience in your store, and can help increase trust and credibility with potential customers, hence converting more.
A better understanding of customer behavior: Structured data can help you better understand how customers interact with your website. For example, if you use structured data about the age, gender, and location of your customers, you can know if certain age groups or genders are more likely to make purchases.
If you wish, you can also check if there are certain locations where you see higher customer activity levels. In essence, you can use structured data to track customer behavior over time and see how it changes. This can be useful for identifying trends or patterns in your customer base.
Common Types of Structured Data
- Reviews: Almost everyone checks reviews before purchasing online. So if your store has good reviews, maximize it. Display customer reviews, with stars indicating your product ratings.
- Organisation/Person: This includes details about your business or personal brand. An example is an image of a business card with your name, contact information, and business location on your store.

- FAQ: A section with a list of FAQs answers will help customers find the answers they need quickly and easily.
- Video: These are videos added to your website, either individually or as part of a larger piece of content. For this, you could add a video player to your site with a thumbnail image of the video.
- Recipes: A recipe with ingredients and cooking instructions on a product page, is a perfect example, complete with other data like nutritional content, calories.
- Product Markup: Usually, it includes name, price, and availability, as well as promotions about a product or service you offer.
- Events: Here, you display details about events happening on your website, such as special offers and partnership.
- Customer data: This includes their names, order date, region, etc, helping you segment your customers and tailoring your marketing efforts to specific groups.
Shopify Structured Data Formats
Shopify provides multiple structured data formats to boost the online presence of your online store. Three main types of structured data are commonly used for Shopify. They are:
JSON: JSON-LD is a type of structured data that uses JavaScript Object Notation (JSON) to organize and format data. It is placed in a script tag at the head of a webpage, and it provides information about a page in a machine-readable format.
It is considered the easiest format to use as it does not require any changes to the existing HTML code. It is also the most recommended type by Shopify because it is easier for search engines to understand.
You can simply add JSON as one independent block of code in your page.
Microdata and RDFa: Midrodata and Resource Description Framework are other more difficult formats. Both use HTML tags and attributes to organize and format data. Implementing them requires changes to the HTML code. If you have a developer team onboard, you can consider these two types.
This complexity and their difficulty to be maintained is why they are less commonly used. They can also be relatively harder for search engines to understand.
Nonetheless, they are supported by major search engines and provide additional context to search engine algorithms.
In summary, all three formats are supported by Shopify. However, JSON-LD is the most recommended format by Google. John Mueller from Google made this clear by saying the following in a Webmaster hangout:
“We currently prefer JSON-LD markup. I think most of the new structured data that are kind of come out for JSON-LD first. So that’s what we prefer.”
JSON-LD is also the most fitting structured data format for Shopify merchants as it is less complicated and does not require much technicality and effort to maintain.
Structured Data Schemas
Now that you’ve known types of structured data, the next thing you must know is that all structured data needs to follow a particular format: data schema.
Structured data is the extra information about your pages provided to search engines. While data schema is the language or format in which you present that information. Both can affect your website’s visibility.
You can think of data schema as the pillar for structured data, as it offers a standardized format for all structured data on the internet.
Using a data schema like data-vocabulary.org or schema.org allows you to present your structured data in a format that is easily understood by search engines.
Schema.org is a more widely supported vocabulary developed by a collaboration of major search engines. Data-vocabulary.org, on the other hand, has been discontinued by Google. Therefore it’s not recommended.
With data schemas, your structured data will be formatted correctly whether by a developer or with a tool that implements it. By that, it is easier for search engines to extract relevant information from your Shopify store.
How to Add Structured Data to Your Shopify Store?
Can’t wait to boost your Shopify store’s visibility by adding structured data? But where do you start? Here’s a simple guide.
1. Use a Shopify SEO app like SEOAnt
There are many apps on the Shopify store that can help you generate detailed structured data efficiently and properly in JSON-LD format. Take SEOAnt for an example which ranks top 3 in the Shopify store, it can create structured data for every product on your collection pages, ensuring search engines better understand and interpret the content of your store for potentially higher rankings and traffic.
Here are the steps to add structured data to your Shopify store using SEOAnt:
- Install SEO&Image Optimizer
- Go to the dashboard, and select Snippets- JSON-LD. Select your desired structured type for different pages.
- Start customizing details like URLs, text, logo, etc. Click Save to keep the changes.
- Click Enable to activate the structured data.
SEOAnt is more than just structured data. It also offers a variety of features to improve your store’s SEO such as automatic meta tags generation, rich snippets, and analytics. With a 4.9/5 rating and a free plan (the paid one at just $9.99/month+), SEOAnt is a cost-effective solution for boosting your store’s SEO. Don’t let your store get lost in the sea of competition.
Don’t miss out on the benefits of structured data – get SEOAnt now.
2. Use Google’s Structured Data Markup Helper tool
Google’s Structured Data Markup Helper is a tool that allows you to add structured data to your website by manually highlighting and tagging the relevant content on your webpage. Here’s how you can use it:
- Go to the Structured Data Markup Helper website
- Select the type of data you want to mark up from the dropdown menu. For example, if you want to mark up a product page, you would select “Product.”
- Enter the URL of the page you want to mark up in the “URL of the page” field.
- Click the “Start Tagging” button.
- The Structured Data Markup Helper will load the page and allow you to highlight and tag the relevant content. For example, you can highlight the product’s name and select the “Name” tag from the toolbar.
- Continue highlighting and tagging the relevant content on the page.
- When you are finished, click the “Create HTML” button to generate the structured data code.
- Copy the code and paste it into the HTML of your Shopify store.
3. Do it from scratch manually
To do it manually, you will need to edit the HTML of your store’s pages and add the appropriate schema code. Here’s a general outline of the process:
- Identify the type of schema you want to use. Many types of schemas are available, depending on the type of content on your store. For example, you can use a “Product” schema to mark up a product page or a “Recipe” schema to mark up a recipe page.
- Choose the type of structured data you want to add. Remember that JSON-LD is generally easier to work with.
- Add the structured data code to the HTML of your webpage. You can do this by inserting the code into the <head> or <body> of your HTML document.
- Test your structured data to make sure it is correctly implemented. You can use Google’s Structured Data Testing Tool to test your structured data and see if there are any errors or warnings.
Overall, manually adding structured data to your Shopify store can be very technical. If you’re unfamiliar with HTML and schema code, you may end up messing up your HTML code and negatively impacting your store’s performance. This can result in wasted time and lost revenue.
What structured data markup should you add to your Shopify store?
Different pages usually require different structured data for maximum SEO effects. But how do you make sure you are adding the right type of structured data markup for the right pages? Check below.
Structured data markup for your Shopify product pages
Three basic data types are usually recommended for your product pages: Product, Offer, and BreadcrumbList. They all help search engines understand what your products are and how they’re related to other pages on your site.
Product data: This is the most important type of data for your product pages. This data describes the product itself, including its name, image, and offers or product variants. Some recommended properties to include in your product data are:
- productID
- aggregateRating (average review score)
- brand
- description
- review
- sku (unique Stock Keeping Unit)
- global identifiers (gtin8, gtin13, gtin14, mpn, isbn)
Offer data: This type of data describes product variants and should include:
- availability (e.g. InStock, OutOfStock)
- price
- priceCurrency
Recommended properties for Offer data are:
- itemOffered
- priceValidUntil (in ISO 8601 date format)
- url (the URL of the product page)
- itemCondition
- sku
BreadcrumbList: This data helps search engines understand how your products are categorized. The BreadcrumbList type should include at least one ListItem type, which should have the following properties:
- position
- item
- id
- name
When you have these types of data on your product pages, your products may likely stand out in the SERPs and lead to more clicks.
These data types can also be used together.
Structured data markup for your Shopify homepage
To add structured data markup to your Shopify homepage, you should include the following data types:
- WebPage: To provide information about the homepage itself.
- BreadcrumbList: To show the hierarchy of the homepage within the website and help users understand the context of the page.
- Organization: To provide information about your business, such as your name, URL, description, logo, and contact information.
For the ‘WebPage’ data type, you should include the following properties:
- “mainEntityOfPage” property with the homepage’s URL to specify the main content of the page.
- “headline” property with the homepage’s title to provide a brief summary of the page’s content.
- “datePublished” property with the date the homepage was first published to specify when the page was first available on the web.
- “dateModified” property with the date the homepage was last updated to indicate when the page was last revised.
- “author” property with the homepage’s creator to attribute authorship of the page.
- “publisher” property with the name of the website’s publisher to indicate the entity responsible for publishing the page.
- “about” property with a brief summary of the homepage’s main content to provide additional context for users.
For the ‘BreadcrumbList’ data type, you should include the following properties:
- “itemListElement” property with a list of “BreadcrumbListItem” to indicate the hierarchy of the homepage within the website.
- “itemListElement” properties should have “position” and “item” properties, the position of the breadcrumb in the hierarchy and the name and url of the breadcrumb respectively.
For the ‘Organization’ data type, you should include the following properties:
- “name” property with your Shopify store or website’s name
- “url” property with your website’s URL
- “description” property with a brief summary of your business.
- “logo” property with the URL of your organization’s logo.
- “sameAs” property with links to your social media profiles.
- “address” (PostalAddress) property with “streetAddress”, “addressLocality”, “postalCode”, and “addressCountry” properties to provide your organization’s physical location.
Structured data markup for your Shopify collection pages
The following key elements will help search engines understand the content on your collection pages.
- CollectionPage: This markup tells search engines the page is a collection page, and includes information about the page itself. Make sure it has the following properties:
- name: To help users understand what the page is about.
- url: To find the page.
- Description: To give users an idea of what the collection is about.
- Image: To give a visual representation of the collection.
- ListItem: Helps search engines understand that the page contains a list of items. You should include one ListItem type for each product on the collection page, and and the following properties:
- position: To tell search engines the order of the products.
- url: This will help users find the product page.
- BreadcrumbList: This helps search engines understand the hierarchy of your website. This will help users understand where the collection page fits into the overall structure of your website.
Structured data markup for your Shopify article/blog pages
You can use structured data markup to provide more information about the article title, author name, and publish date. Here are the properties you should add in the “Blog” data type:
- “about” – the subject of the article
- “headline” – the headline of the article
- “mainEntityOfPage”
- “image” – the cover image of the article
- “url” – URL of the article
- “dateModified”
- “datePublished”
- “dateCreated”
- “description” – a description or an excerpt of the article
- “articleBody” – the body of the article
- “author”
- “publisher”
- “logo” (publisher logo)
- “name” (publisher name)
What to Note When Implementing Structured Data?
Structured data implementation is not difficult itself. Yet, sometimes one wrong move and you could negatively impact your website SEO or even face penalties from Google. Here are a few key considerations to keep in mind.
1. Read Google’s Webmaster Guidelines & General Structured Data Guidelines
You don’t have to be perfect when implementing structured data on your website. But at least, you should avoid getting marked as spam, penalized, or not properly indexed. That’s where these guidelines come in. What better than to hear the best practices from the horse’s mouth?

2. Choose your primary pages
For Shopify, the main page types are homepage, collection, product, blog, and article pages. They should be considered as primary pages as they are likely to receive the most traffic and have the greatest impact on your SEO.
3. Decide the types of structured data your Shopify pages should contain
After choosing primary pages, you should decide the structured data they should contain, as different pages may require different types of structured data to be effective.
For example, a product page may benefit from structured data that includes the product’s price, availability, and ratings. For a news article page, you can consider adding the author profile and publication date.
4. Test your structured data markup
You need to ensure your implemented structured data markup is being read by search engines. Use free tools like Google’s Rich Results Test and JSON-LD Playground to run a test.
Why isn’t my structured data not showing up?
There is no guarantee for Google to display your structured data in the SERPs even if you do everything right. Google tailors search results to provide the best experience for users, based on factors such as user search history, location, and device type.
However, there are still things you can bear in mind to increase the likelihood for your structured data to be properly recognized by Google.
- Outdated or Irrelevant Structured Data: If the content referred to by the structured data is outdated or no longer relevant, Google may choose not to display it in search results.
- Incorrectly formatted URLs: If the URL in the structured data does not match the actual URL of the page, Google may be unable to find the page and the structured data will not be displayed.
- Incorrect type: If you have specified the wrong type of structured data, it may not be recognized by search engines. For example, using “Product” structured data on a blog post page instead of “BlogPosting” structured data. This could prevent you from getting rich snippets.
- Missing required fields: Some types of structured data require specific fields for Google to understand your content. One example of this is the “name” field in the “Organization” structured data type. If this field is missing, the structured data may be ignored by Google.
- Violations of the guidelines: Some violations of the structured data guidelines can cause it not to show up, such as fake reviews, impersonation, etc. Click here to know more.
- Indexed though blocked by robots.txt file: If you have a robots.txt file that disallows crawling all or some of your pages on your website, Google will not be able to access their structured data.
- Misrepresentation or Misleading Structured Data: If the structured data does not accurately represent the main content of the page, Google may choose not to display it in search results.
What are the cons of structured data?
While structured data can present your page information in an organized manner, it also has its downsides.
- Limited flexibility: Structured data is typically less flexible than unstructured data, as it has to follow a specific format. It may not be able to accommodate the updates in your web page’s content.
For example, if a product’s price changes, the structured data will also need to be updated to reflect the new price. Otherwise, search engines will display incorrect information to users.
- Difficulty in handling:
Structured data may need a lot of resources to store and process, which can potentially slow down your site speed. Therefore you must use the lightweight JSON-LD format. Mishandling could easily result in errors in the search results. So you should either use a professional app or hire a developer team.
Wrapping up
In fairness, who doesn’t like to instantly know more of a product before purchasing? Compared to a thin search result with only a title, a meta description and a link, who doesn’t trust a store with high-quality images and appealing, rich content like golden stars, high ratings, special attributes more? Customers don’t just buy your products, but also buy how pleasant and trustworthy your pages make them feel.
With structured data, you can provide your customers with all these details in an easy-to-find format.
How to Compress Images on Shopify Efficiently?
Is your Shopify website taking longer to load than expected? Are you receiving error alerts while uploading large image files on your Shopify store?
Either case, it means you need to consider compressing your website images. Because images with large file sizes take up a great percentage of your store weight and can consume your site loading time like crazy.
Besides, the cherry on top, Shopify doesn’t let you upload images larger than 20 MB.
With clunky images, your website’s SEO would likely “de-rank” and create a negative user experience.
If you don’t want your website to end up like this, read further and find out how you can compress images on Shopify efficiently.
What is Image Compression?
It won’t be wrong to say that image compression plays a crucial role in your Shopify store performance.
In short, image compression is a process to make your image byte size smaller than its original state. It also includes converting the image file into another format.
Depending on the compression algorithms, it can either compress your Shopify images by reducing the number of colors in them, or strip away any unnecessary metadata from them. Or it can merge similar patterned data of your images and convert them into smaller file sizes. Your image quality may or may not be degraded.
The purpose of image compression is to serve minimized image file sizes while storing the image data in a qualified form. It decreases the redundancy of the image and shrinks the number of bits needed to represent that image. By compressing images you can easily save its storage space and utilize less bandwidth when it’s being loaded, transmitted or downloaded.
Types of Image Compression Techniques
Image compression falls into two categories, namely lossy compression and lossless compression. Both compression types serve the same purpose, which is reducing the image file sizes, yet differ in some ways.
However, that doesn’t make any of them less useful.
Lossy Compression
Lossy compression compresses your image file sizes by discarding any unnecessary information from your images. This leads to reducing file sizes. However, you get to lose some image quality with this type of image compression.
Pros: Images compressed through lossy compression have much smaller file sizes than lossless compression.
Cons: Lossy compression is irreversible. You can not retrieve your Image data after performing lossy compression. Overdoing lossy compression can distort your Shopify image completely.
Formats: JPEG, GIF
Lossless Compression
Lossless compression is a type of image compression that reduces the image file size without removing any image data.
It compresses the image file sizes while ensuring that the quality of the images is maintained.
Pros: Since lossless compression doesn’t remove any of the image data, the quality of your images and image details are not compromised. Also, The changes made in lossless compression are reversible.
Cons: Although lossless compression can compress images in the highest quality possible, it doesn’t provide reduced file sizes as lossy compression does.
Lossless compression doesn’t save that much storage space as lossy compression does.
Formats: PNG, BMP, RAW
How Does Image Compression Work on Shopify?
In order to keep websites loading fast, Shopify algorithms auto-compress your images and reduce their file size. Moreover, Shopify automatically detects the best possible format to deliver the images.
However, the auto-compression feature of Shopify can decrease your image quality and resolution, resulting in the appearance of blurry and fuzzy images.
You can save your time by using a professional Shopify SEO and image optimization tool like SEOAnt.
How to Compress Images on Shopify Efficiently?
SEOAnt is the perfect app to help you compress your images, whether manually or automatically. It works best with any Shopify theme and is simple to operate. It facilitates faster website speed by bulk-compressing your images in one go.
SEOAnt allows you to compress your image sizes by 50% to 80%. It gives you a lot of flexibility too. You can choose between lossy compression and lossless compression, and even customise the compression rate!
- Bulk-compress with the SEOAnt App Automatically
- Manually upload and compress images
- Convert PNGs to JPGs in batch
Here is how to do it:
- Install SEOAnt’s SEO&Image Optimizer.
- Go to the dashboard, and choose Image Optimization.
- On the right, choose the Settings icon beside Account Overview. Switch on the Optimize Images button. Choose the compression mode and images you want to compress. Save the changes.
Why Do You Need to Compress Images on Your Shopify Store?
Uncompressed images take a considerable amount of time to load, leaving your client frustrated. This will collapse your product’s sales, and nobody wants that.
Here are various reasons why compressed images can enhance your Shopify store game.
- Fast Page Load Times: Compressed images help decrease your image file sizes, and reduces pressure on your servers, making the loading of images on your website quicker.
A fast-loading website provides a better user experience, leading to improved engagement and potentially higher conversion rates.
- Enhanced SEO: Google search considers site speed as a ranking factor. By making your site load faster, reduced image sizes lowers your site bounce rate, and takes off your conversion rates. Google and other search engines are more likely to start giving you good rankings and favorable placement.
- Finer Mobile Experience: Today over half of the e-commerce sales are done on cell phones. Your Shopify store must be speed-optimized for mobiles. Otherwise oversized images on your Shopify website will lag your store and you lose essential opportunities to thrive.
- Reduce Bandwidth: Small image size can shrink the amount of bandwidth used by your store, resulting in speedy content delivery and overall scalability of your website.
This was all about compressing your Shopify images. But if you thought that compressing your Shopify images was enough for your store’s optimization.
You’re wrong!
There are other factors that you should also look after for your Shopify store’s growth.
Other Image Optimization Tips for Growing Your Shopify Store
Want to ace your image-compressing game? Below are some fantastic tips that’ll instantly level up your usage of Shopify images for stronger growth.
- Resize Image: Overstretched images on your Shopify website might appear blurry or overstretched. This doesn’t look visually appealing to your potential customers. Resizing them to an appropriate size builds up consistency and customer trust.
- Add image Alt Text: Your website should be user-friendly to even those who are unable to view images on the store. It’s best practice to add Alt text for visitors using a screen reader or with a slow internet connection. It helps Google index your pictures faster, too, and drives in image traffic.
- Lazy Loading: This useful tip evolves around page loading speed. eCommerce owners apply this approach to get a hold of customer interaction in their stores. Instead of loading all images at once, lazy loading only loads images clearly on the site when readers have scrolled down to them.
- Utilize WebP Format: WebP is the modern file format that can compress up to 34% more image file sizes than JPG file format and 26% more than PNG file format.
Shopify only supports JPEG, PNG and GIFfile formats. But it can automatically upload images in WebP format if the browser supports it.
Compressing your Shopify images can be tricky if you have only a little know-how about its technicalities. But, With this guide, you can learn how easily.
If you don’t want to take the hassle, simply use the SEOAnt Shopify app and leave the rest to it!
FAQs
- Is JPG or PNG better for Shopify?
Both are good for Shopify, depending on your use cases.
Jpg is of smaller sizes and can be loaded fast. You should use a JPG image format where image size matters for you rather than the image quality, like the product and collection pages. On the other hand, PNG images provide you with images that are of much larger space but higher in quality, like your store logo.
- What is the best image format for quality?
The PNG image format is the best in terms of image quality. It provides images that are clear, crisp, and higher in quality. However, the disadvantage of using PNG format is its relatively larger file sizes.
- Does image compression reduce quality?
Lossy compression can reduce the quality of your image. If it is overdone, it can completely distort the original image. Lossless compression doesn’t affect your quality.
- How to compress images without losing quality on Shopify?
You can use the SEOAnt Shopify app for this purpose. It also supports lossless compression which compresses your images without any quality loss. All it takes is a few seconds, and that’s it.
- Which image format is most compressed?
The JPG image format is the most compressed. Shopify also recommends it for compressing product images, blog posts, and pages on your Shopify store.
- What pictures need to be manually compressed on Shopify?
Images present in the Customize Theme section and the Files section of settings should be manually compressed, as well as images located inside your blog posts and pages.
- How to get around Shopify’s automatic image compression?
There isn’t a turn-off option available on Shopify to stop your images from being automatically compressed. However, you can get around it with a few tips. Here they are:
- Make sure to compress your images before you upload them to your Shopify store. Only this way can you stop Shopify from automatically compressing your images.
- Shopify recommends the jpg format for uploading product images. While the png format is best for images with transparent backgrounds. Make sure to upload your images in the following formats beforehand.
- For product photos, 72 pixels per inch (PPI) is the best resolution. While 300 PPI is best for uploading graphics. Make sure to upload images as per this resolution.
- What type of compression is best for images?
Both types of image compression are good. They both have their own significance.
Lossy compression is best for images with complex color details. In Shopify, it’s most suitable for products, banners or slideshows, pages, and blog post images.
Whereas lossless compression is best for compressing images with solid colours. Shopify recommends lossless compression for logos, icons, borders, and trims.


